

Would you like to transfer or synchronize data?
You can try FREE APPLICATION from online stores:


PhoneCopy.com is a web service which is free for personal purposes (with few limitations). This tutorial will show you how to backup your data from BlackBerry Motion. The whole process can be completed in few minutes.
This guideline also works for similar devices like BlackBerry Aurora, BlackBerry Evolve , BlackBerry KEY 2, BlackBerry KEY 2 LE, BlackBerry KEYone CDMA, BlackBerry KEYONE DUAL SIM, BlackBerry KEYone Dual SIM TD-LTE.
Download PhoneCopy for Android to your Android phone, which you can download free of charge. After downloading and installing, go through the following steps.
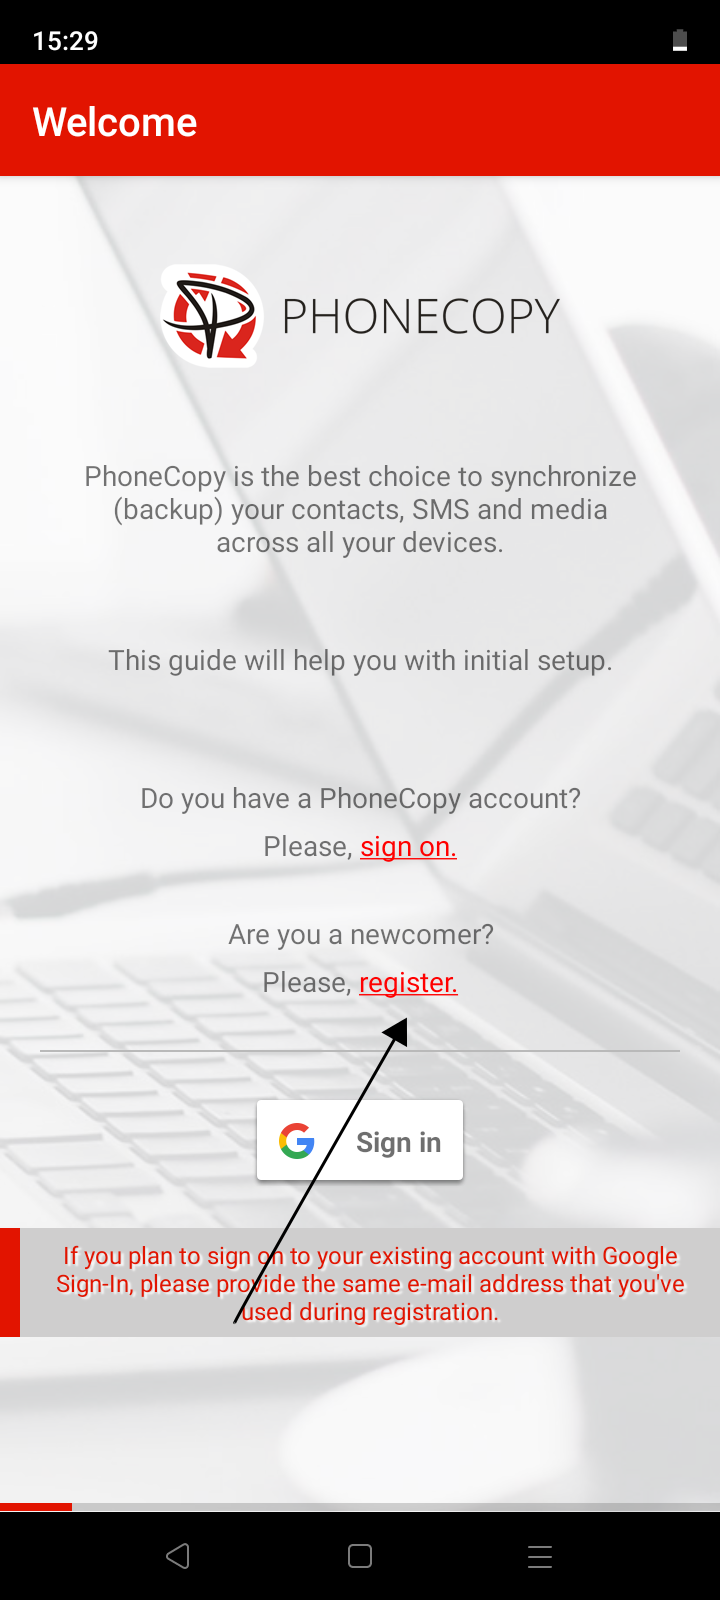
Run the app and create a new account or log in to your existing account.
1. Run the app and select register.
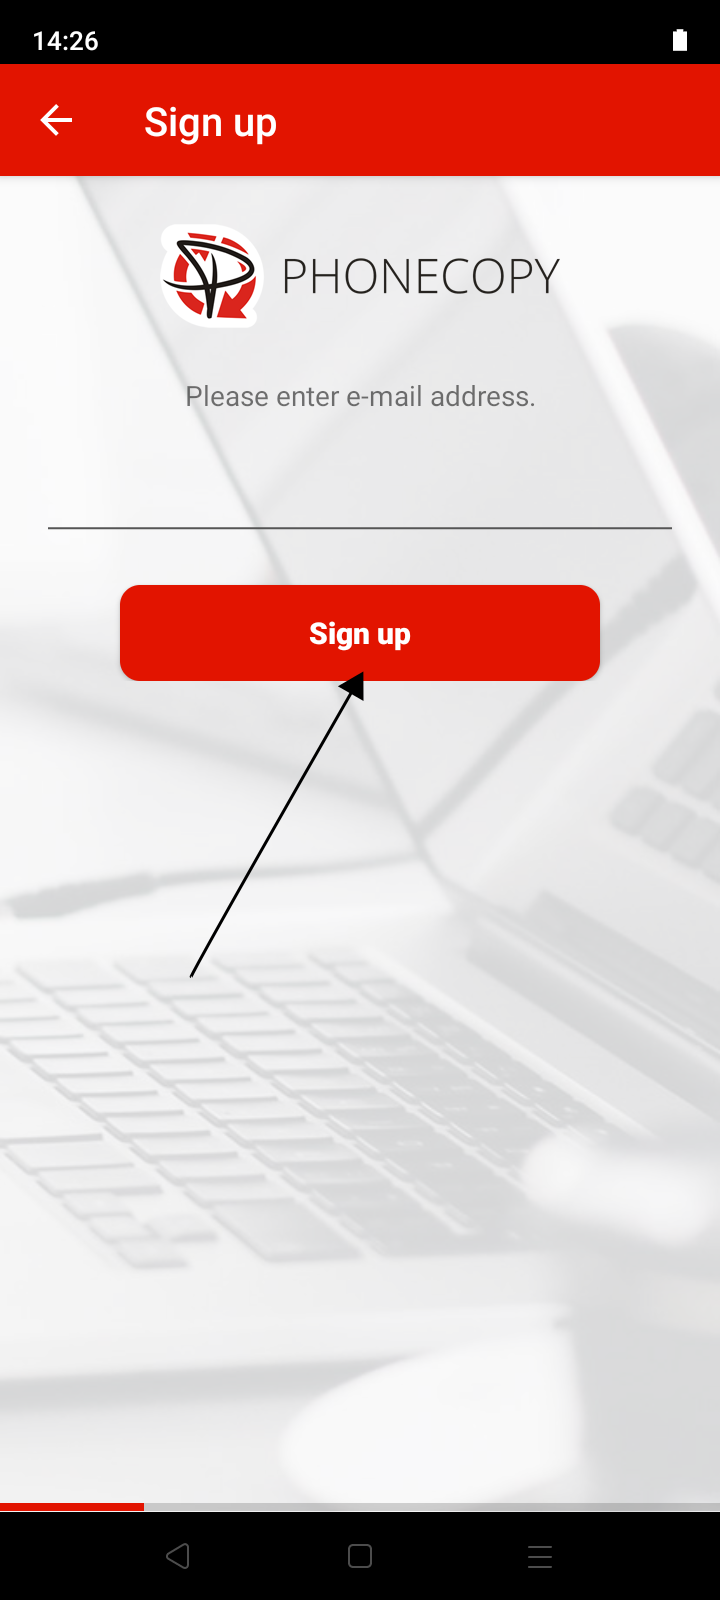
2. Enter your email address and press Sign up button. A registration email will be sent to the entered email address.
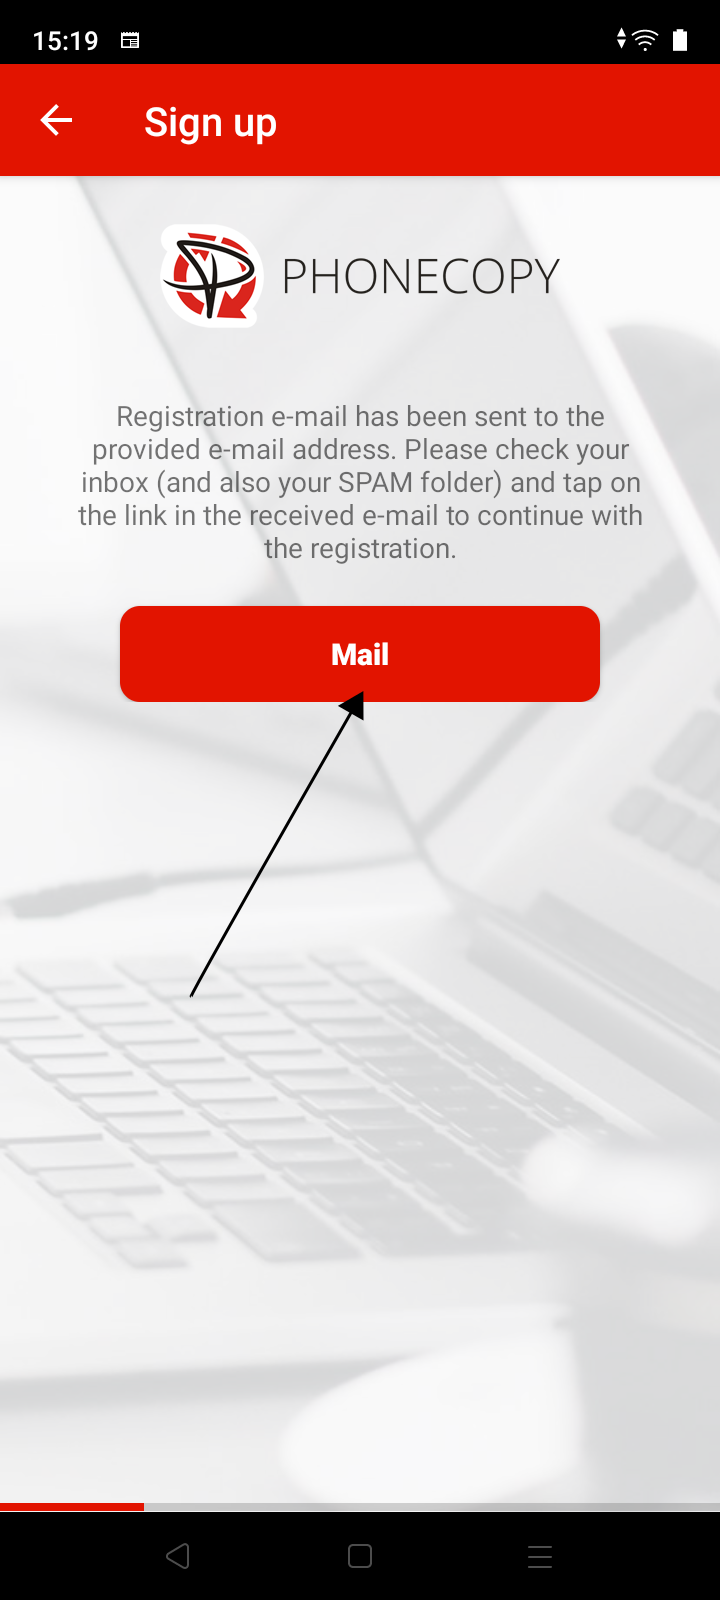
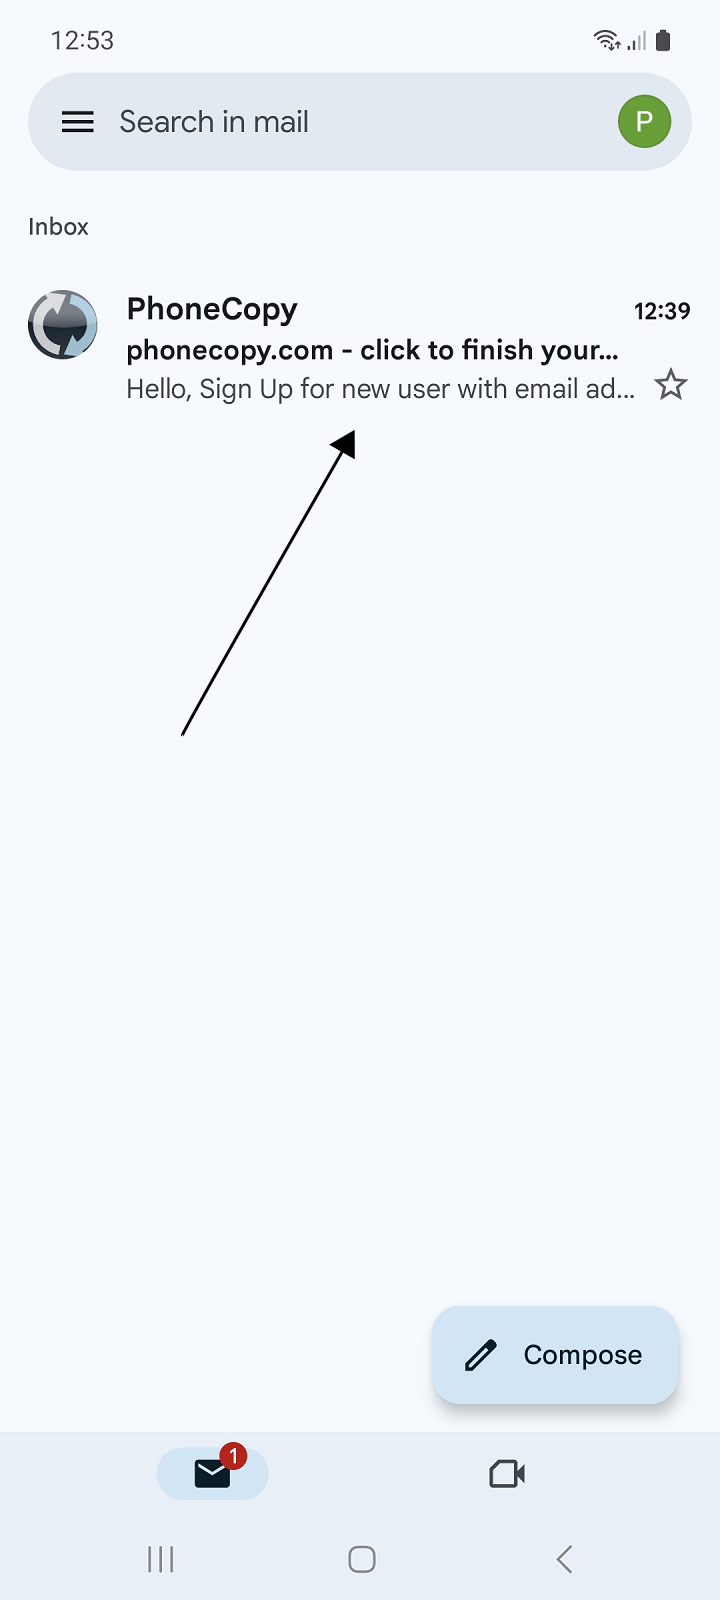
3. Press Mail button to open your email inbox on your phone.
4. Check the inbox of the specified email inbox (or SPAM folder) on your phone or computer.
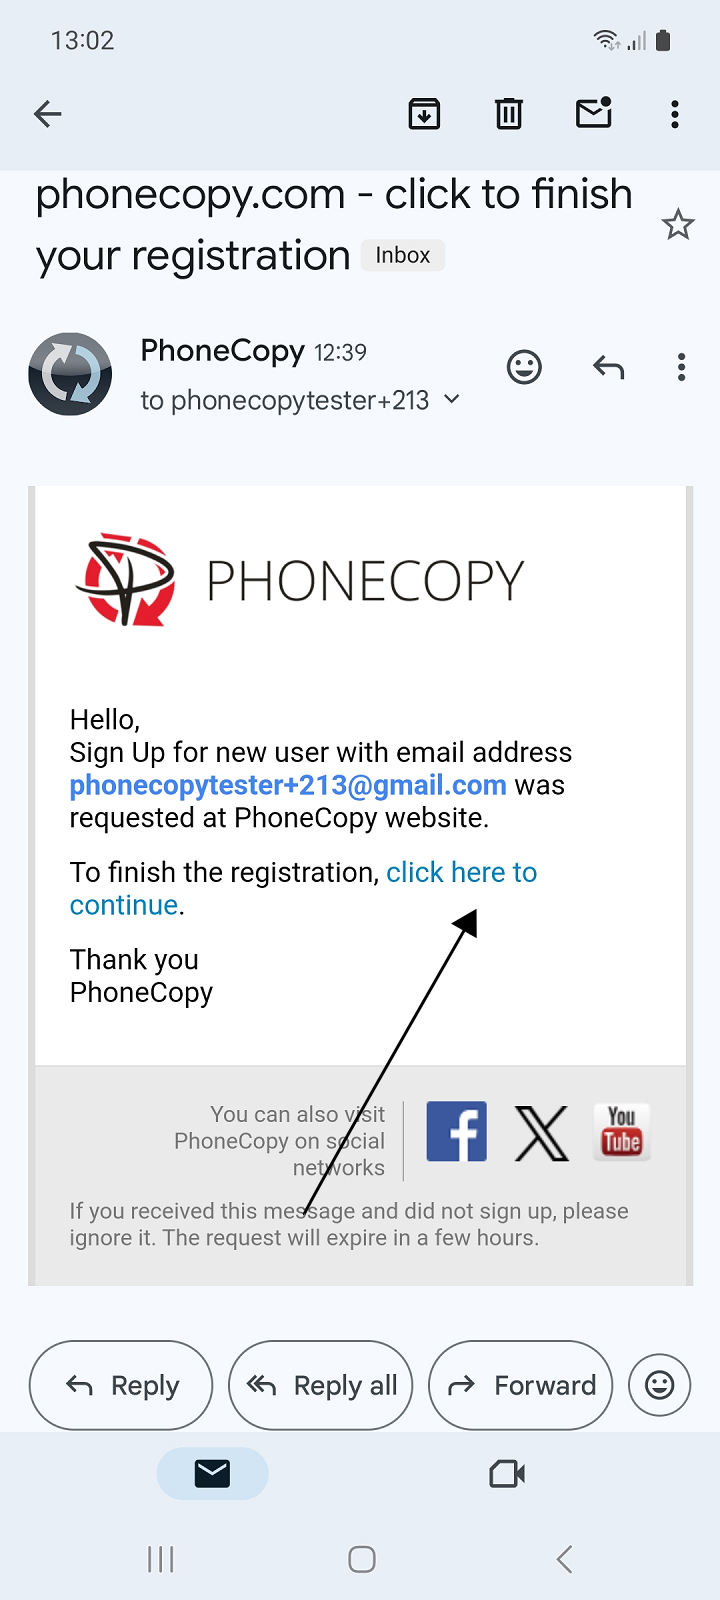
5. Continue by clicking on the link in the registration email. The app will open to continue registration. If you click on the link on a computer, the registration will continue on the PhoneCopy website.
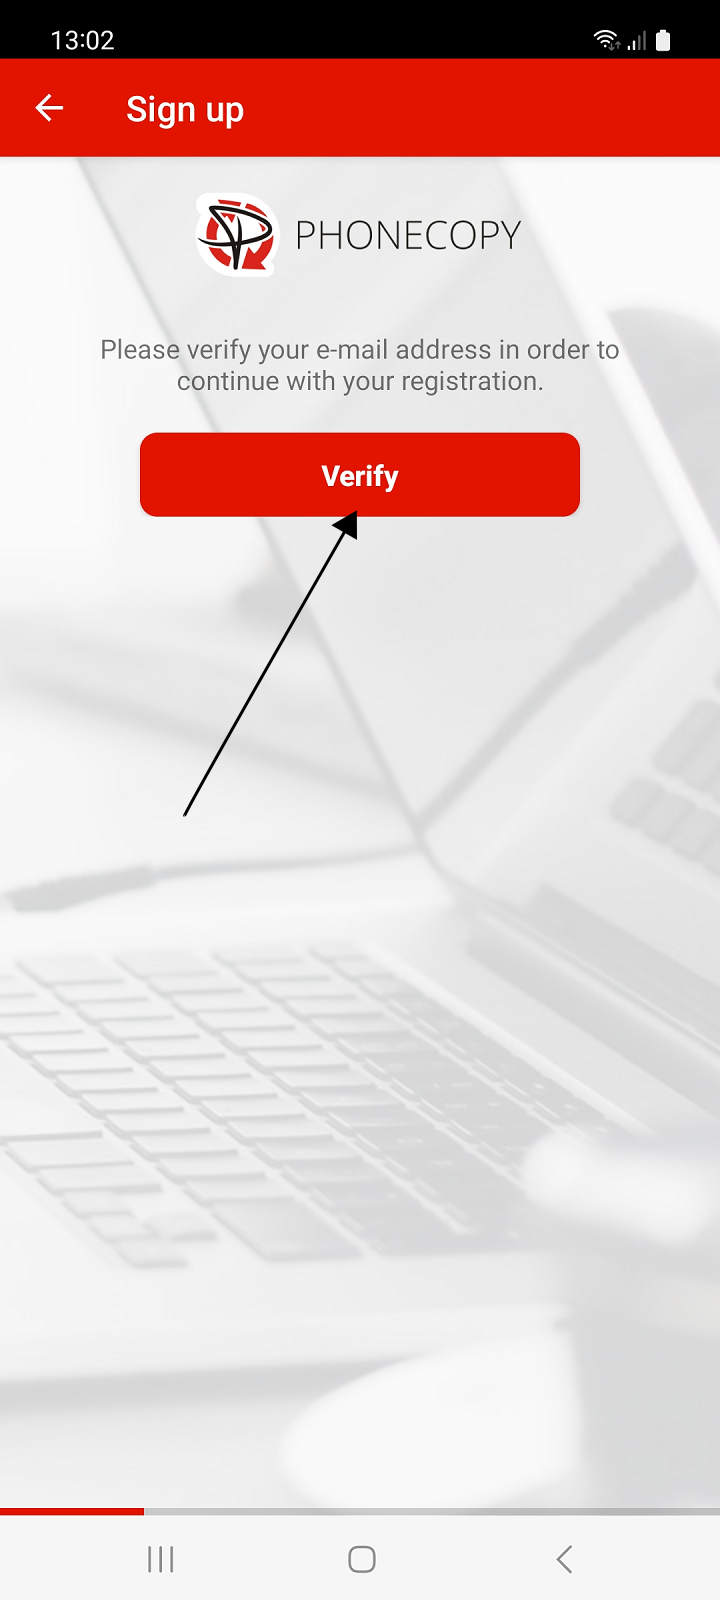
6. Press the Verify button to verify the entered email address.
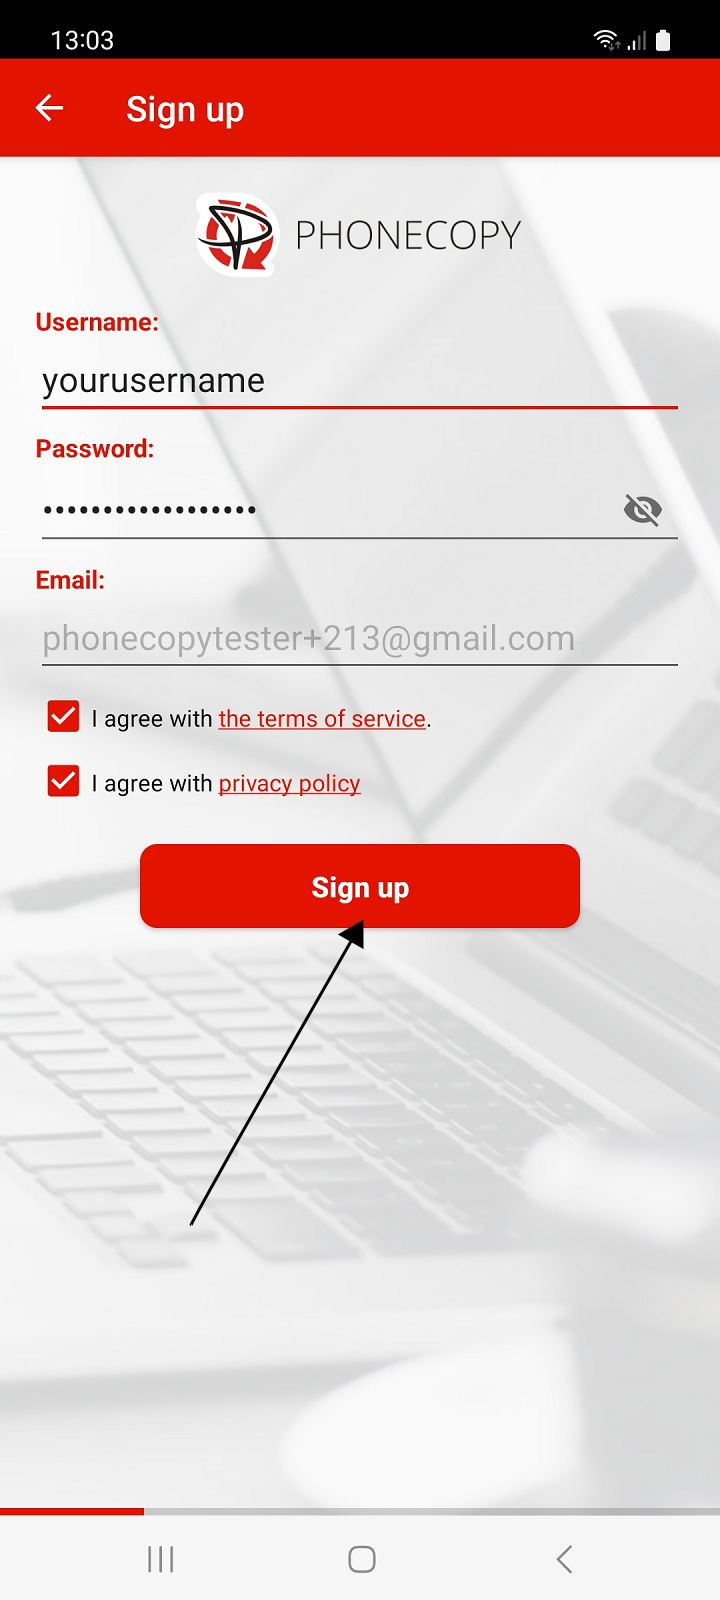
7. Fill in your username and password, and confirm your agreement to the terms and conditions and privacy policy by ticking and press the Sign up button.
You can use your Google account to create a new PhoneCopy account. In this case, email address verification or password entry is not required during registration.
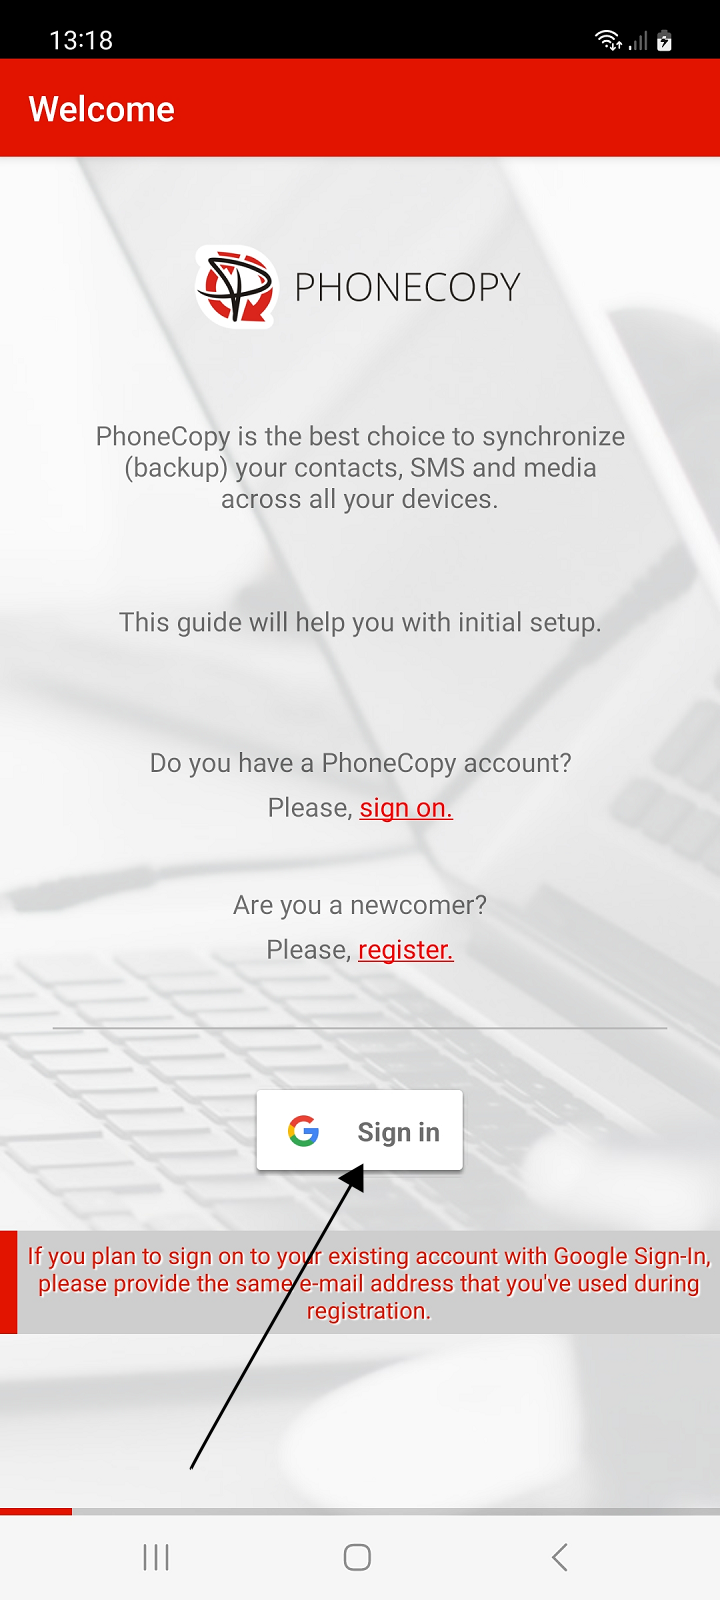
1. Run the application and press the button with the Google icon and the Sign in label.
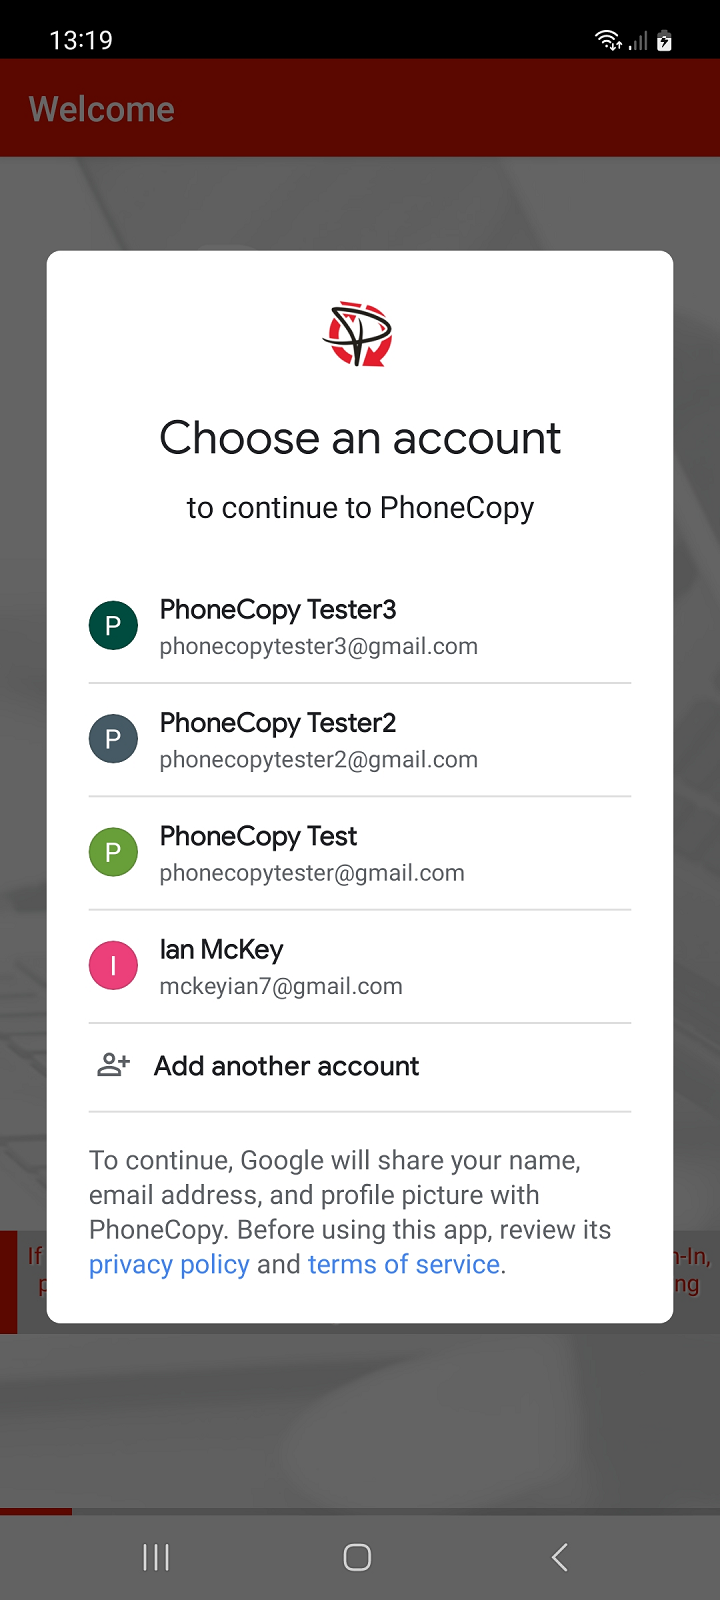
2. Select a Google account (Gmail) to register. If you choose the same email address that you used to register another account, you will be signed in to an existing account.
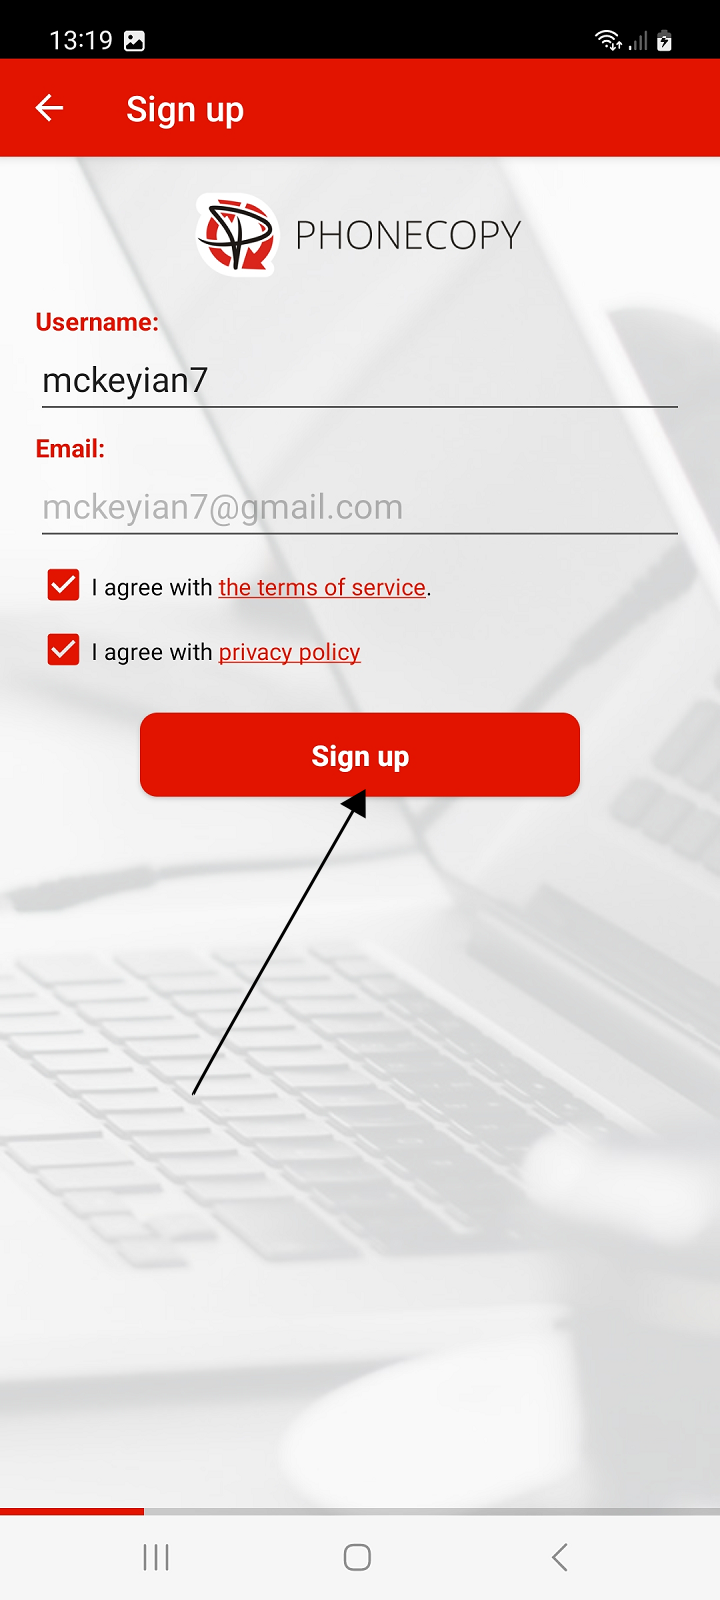
3. Fill in your username, and confirm your agreement to the terms and conditions and privacy policy by ticking and press the Sign up button.
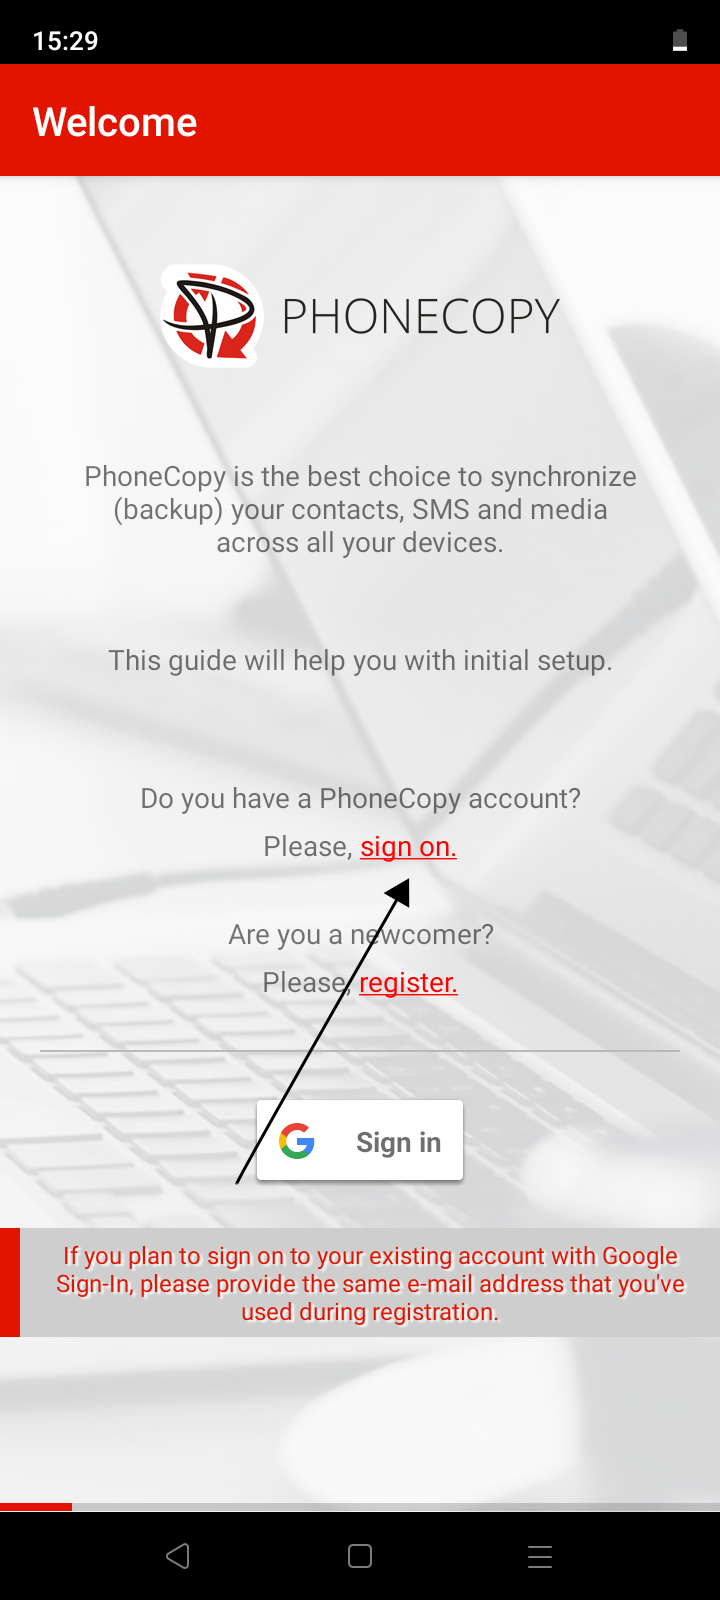
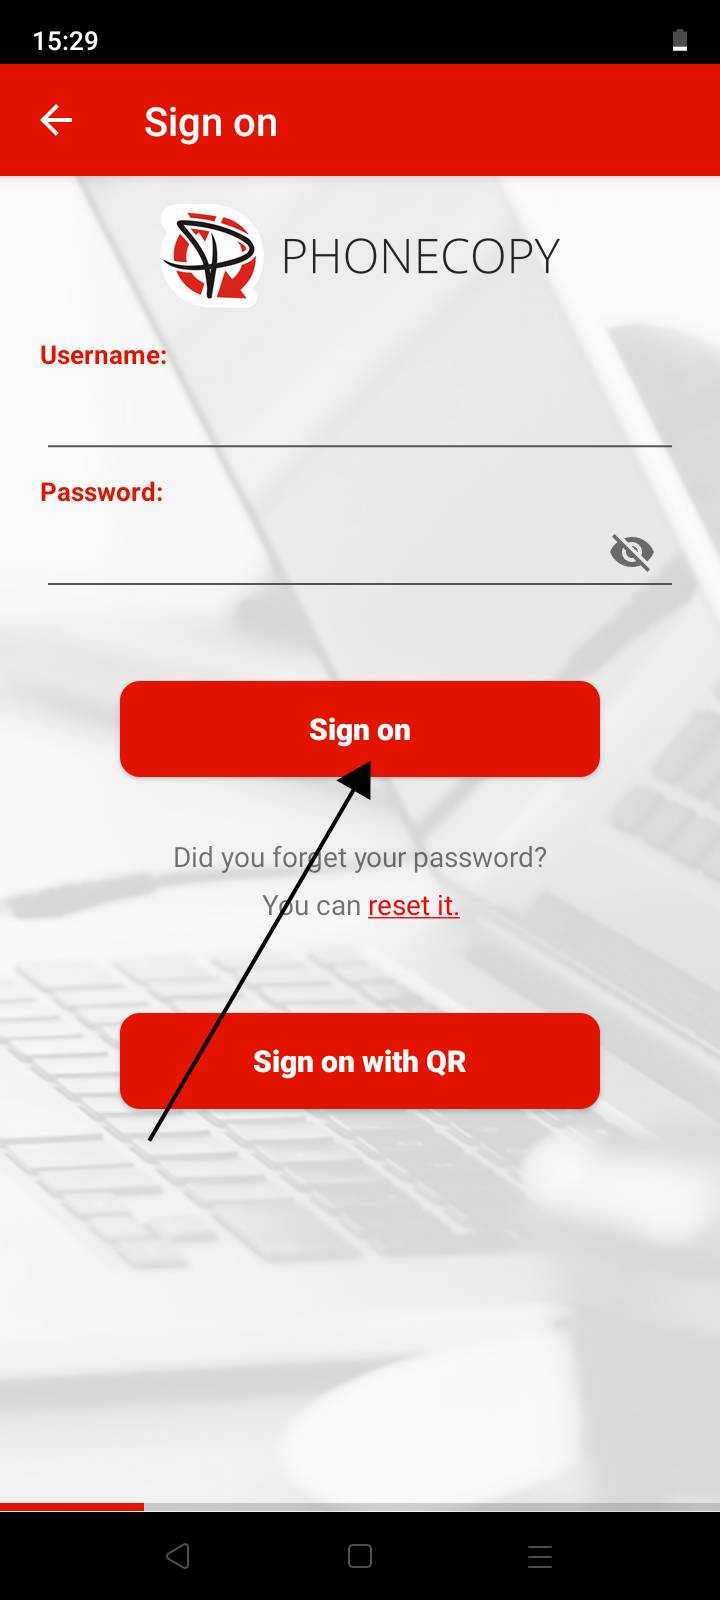
1. Run the app and select sign on.
2. Fill in your username and password and press the Sign on button.
If you are going to transfer contacts, SMS, photos and videos from one phone to another, then the possibility of simply logging in another device using a QR code without the need to enter login credentials may come in handy.
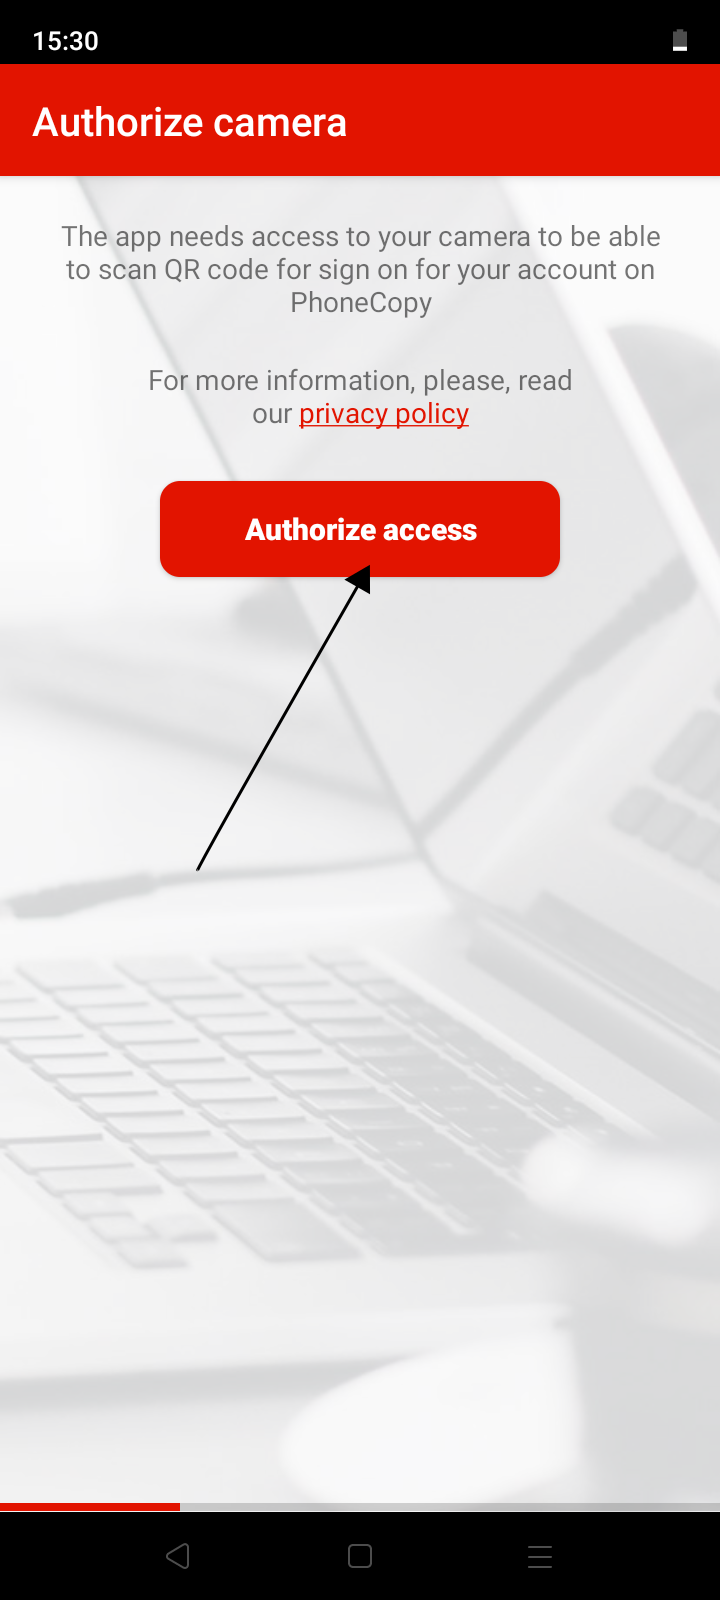
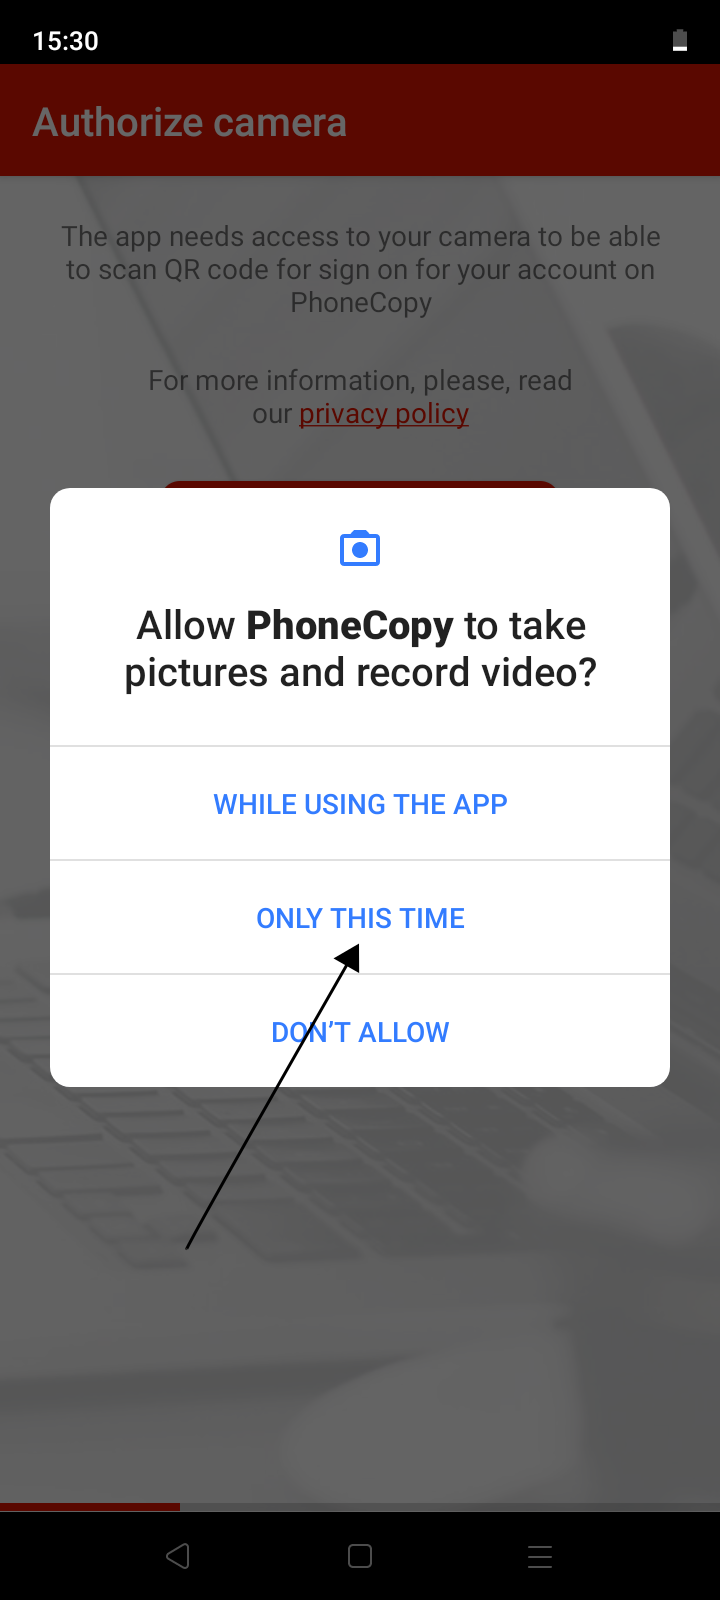
A QR code for login is generated on the first phone and you scan the code with the second phone. The app must be allowed to access the camera to scan the code.
On the first phone:
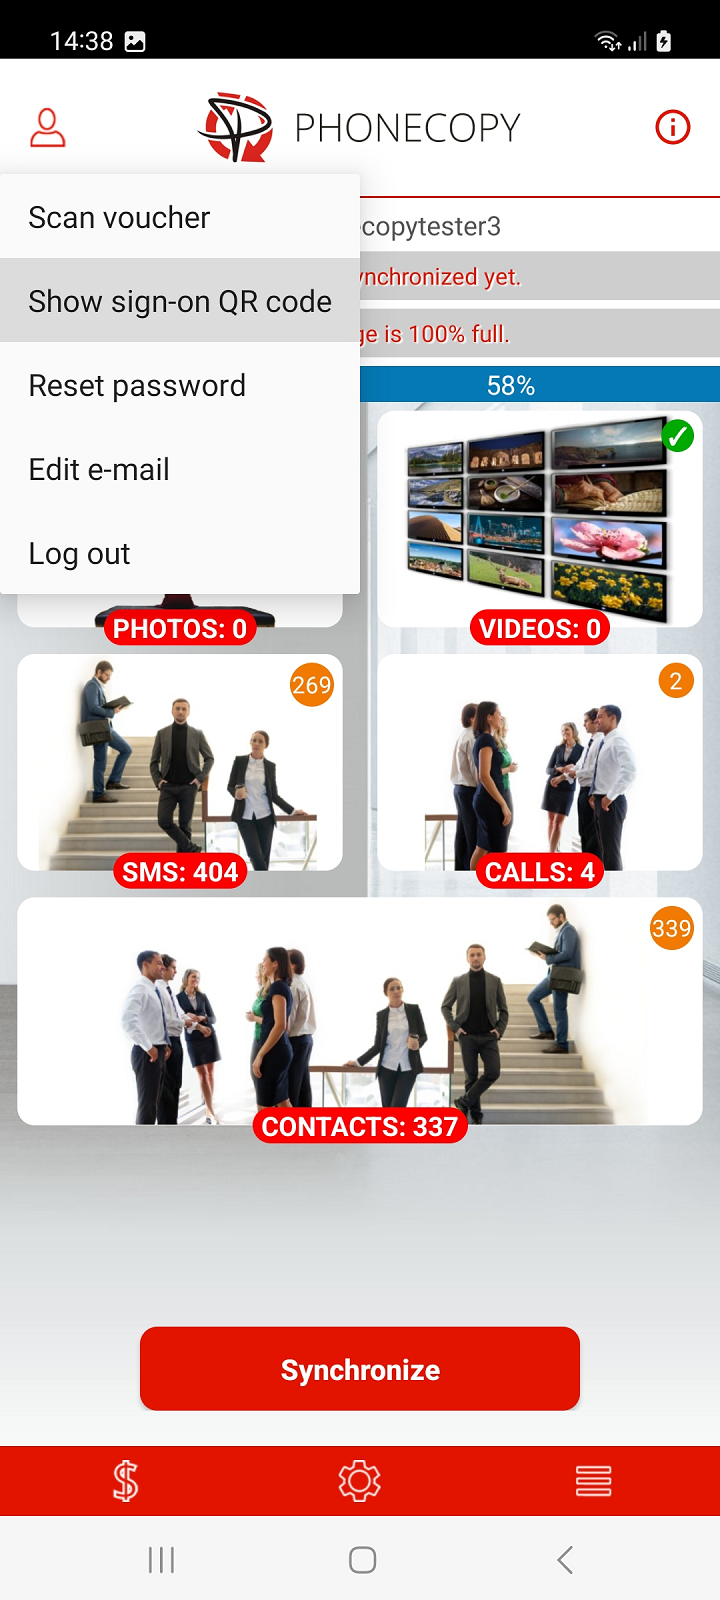
1. Run the application. If you are not already signed in to your account, please sign in.
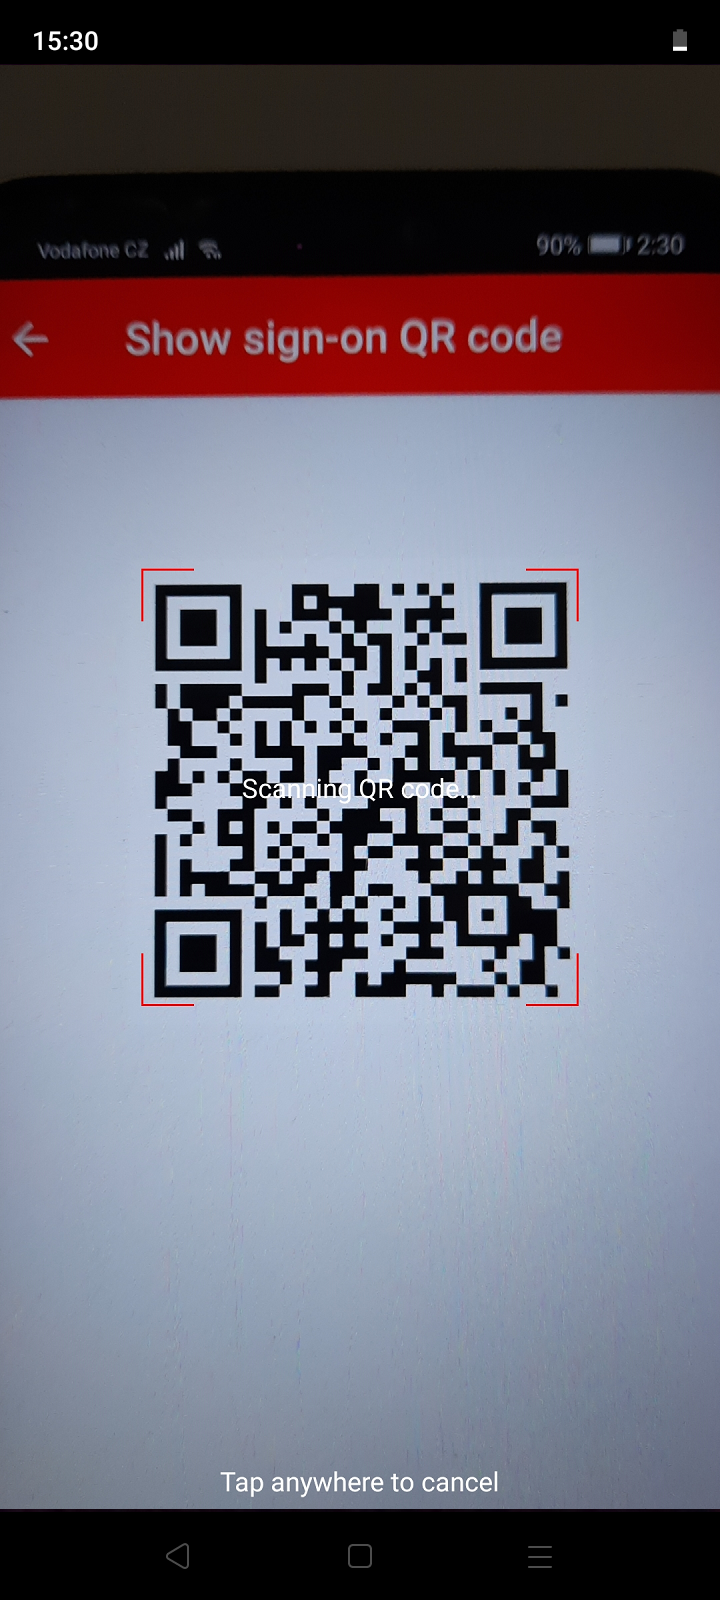
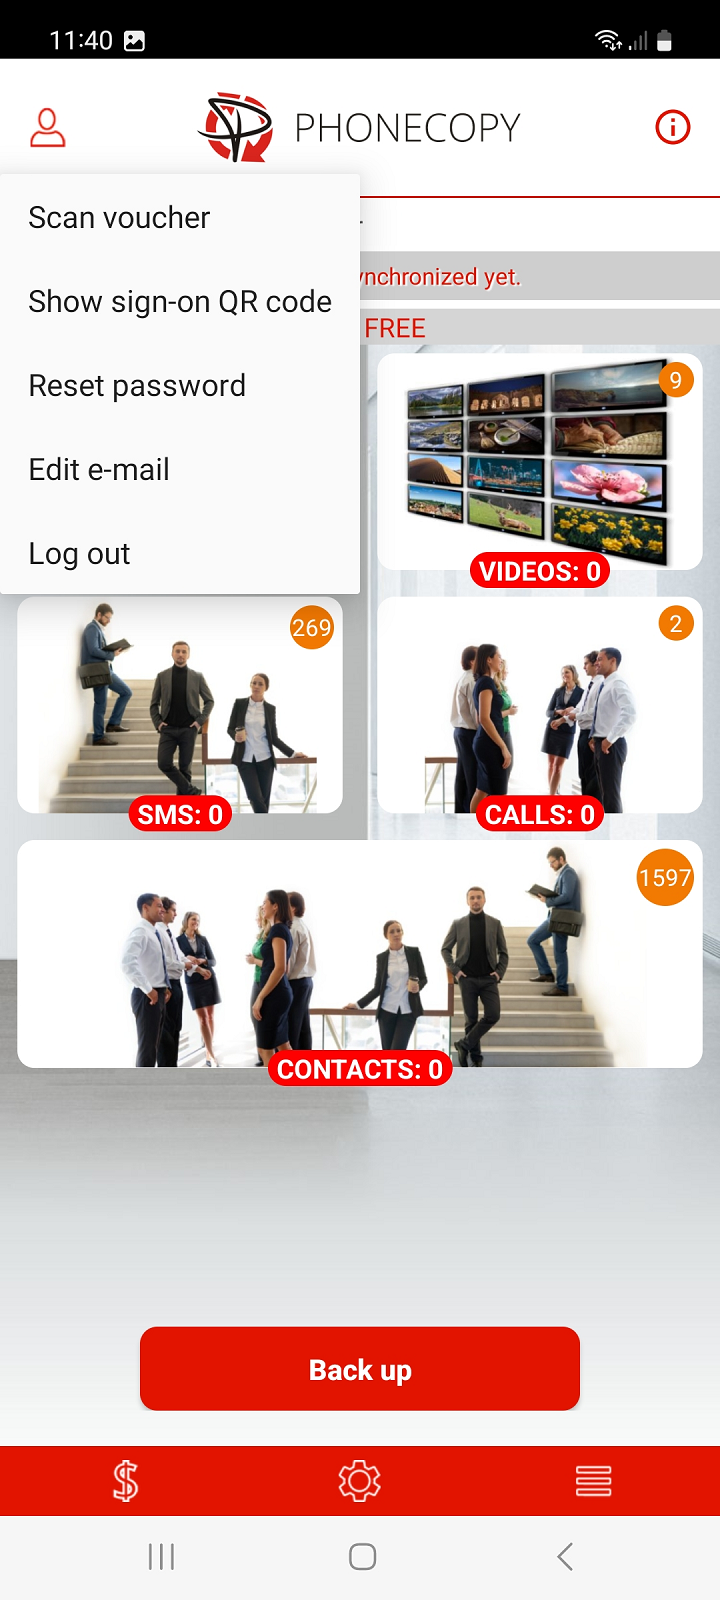
2. On the main screen of the application, select Show sign-on QR code in the upper left menu.
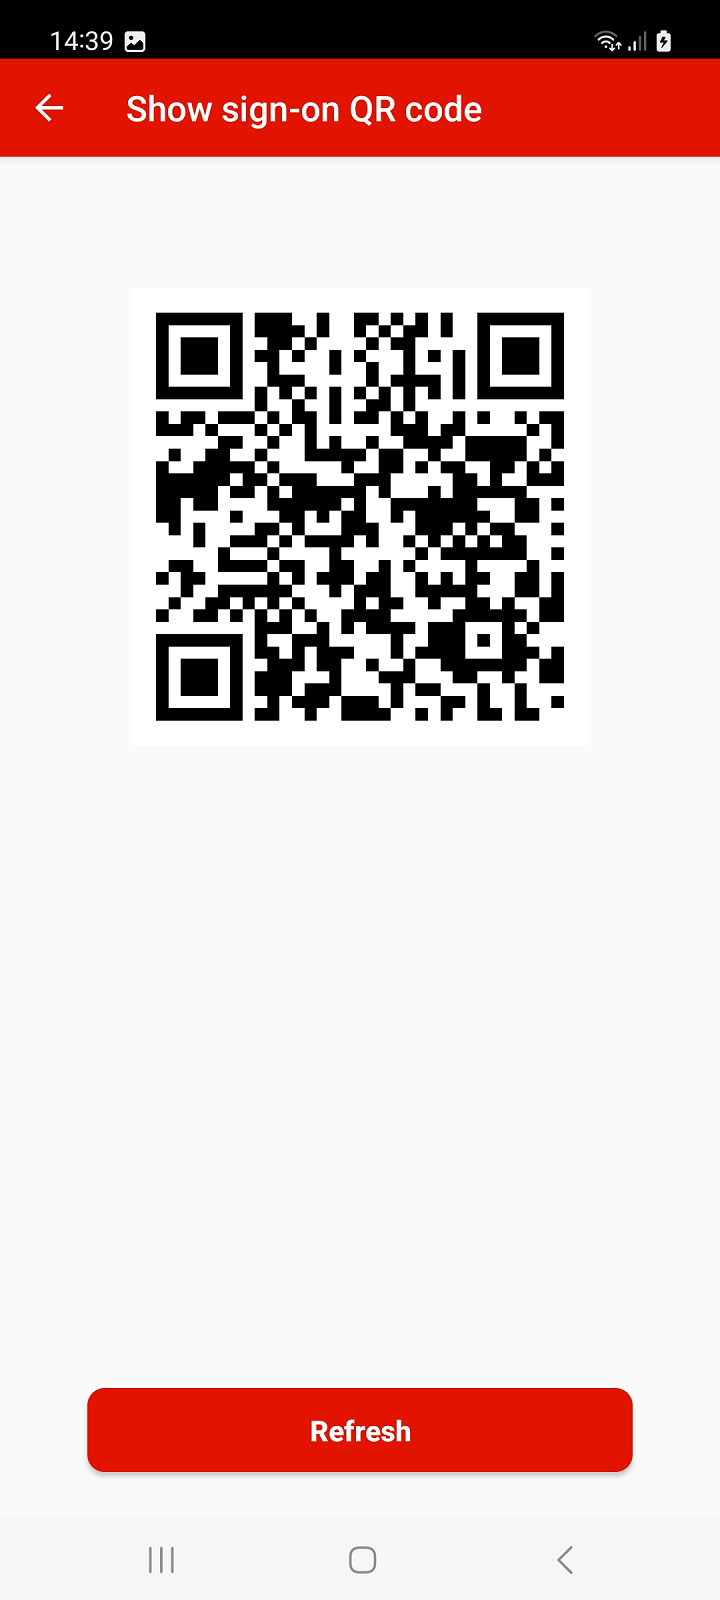
Note: The QR code for login can also be generated from your PhoneCopy account on the website. Sign in to your account at PhoneCopy and proceed to Settings > Devices > Add new device using QR code or use this link: Add a new device using QR code
On the second phone:
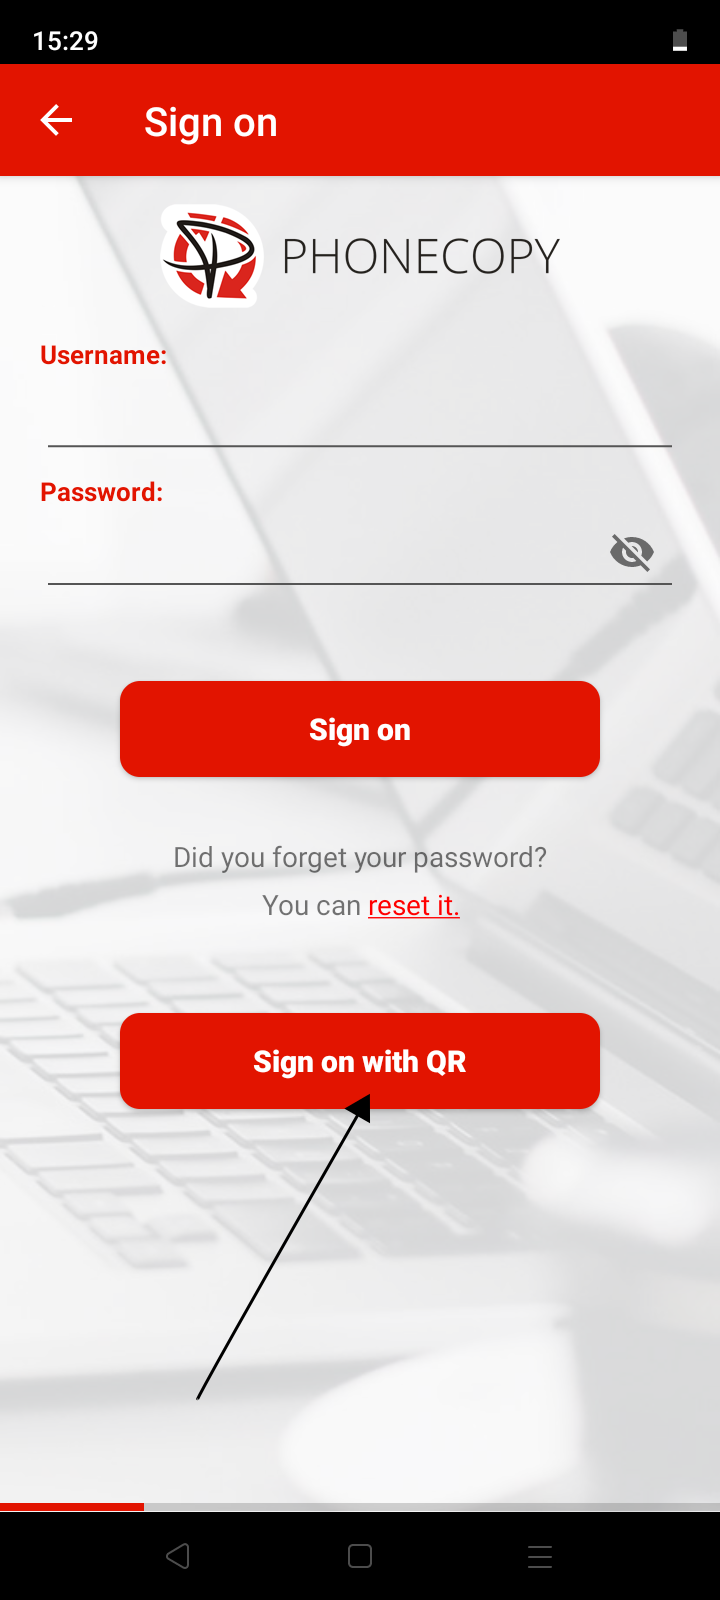
1. Run the app and select sign on.
2. Select Sign on with QR.
3. Allow access to the camera.
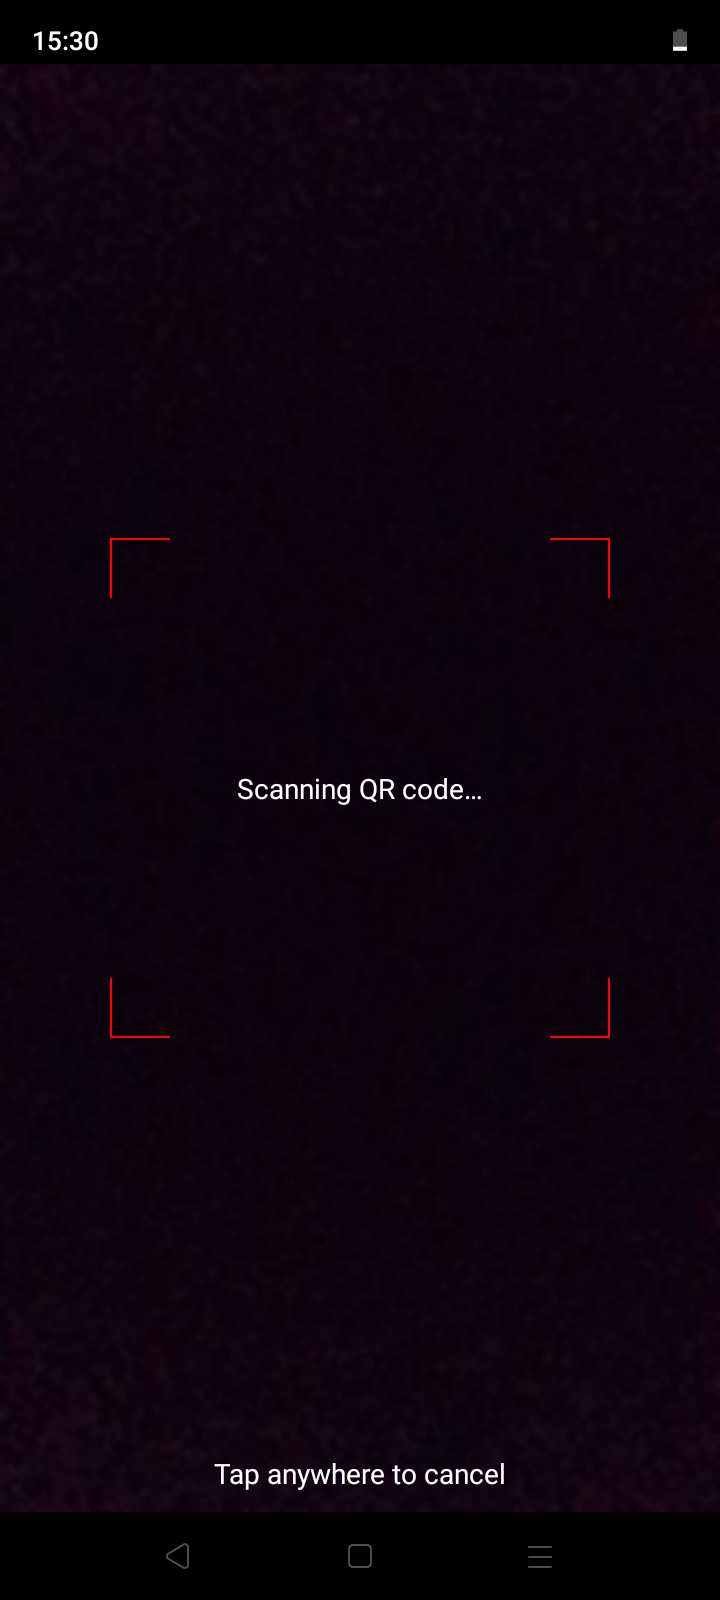
4. Aim the QR code that is displayed on the first phone so that it is placed in the red frame.
To log in to an existing PhoneCopy account, select the (Gmail) email address you used during registration. By choosing a different email address, you will register a new account.
After a successful login, the application will guide you through the basic settings for backing up contacts, SMS, call logs, photos and videos from your phone.
Follow the instructions.
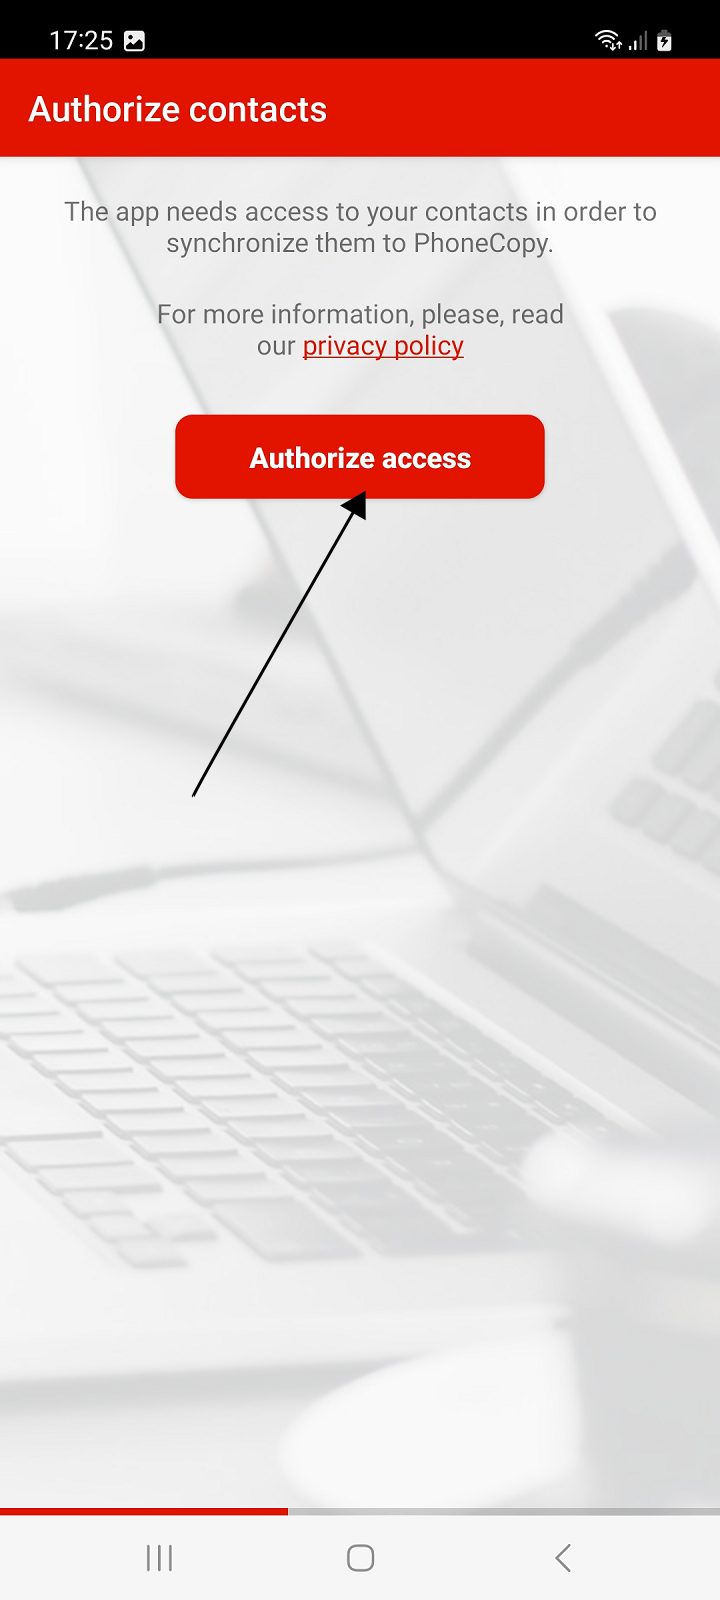
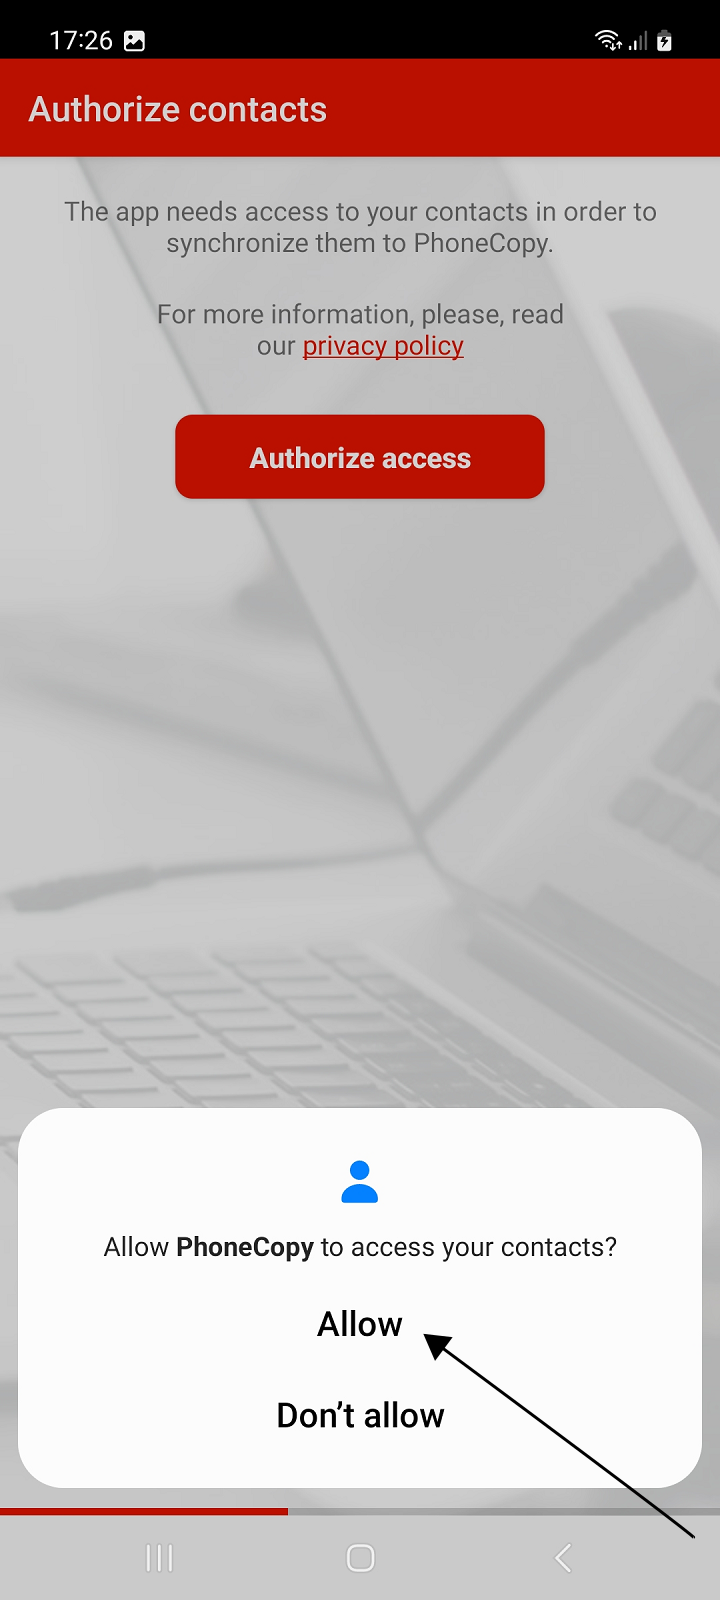
Allow the application access to contacts to back up your contacts from your phone.
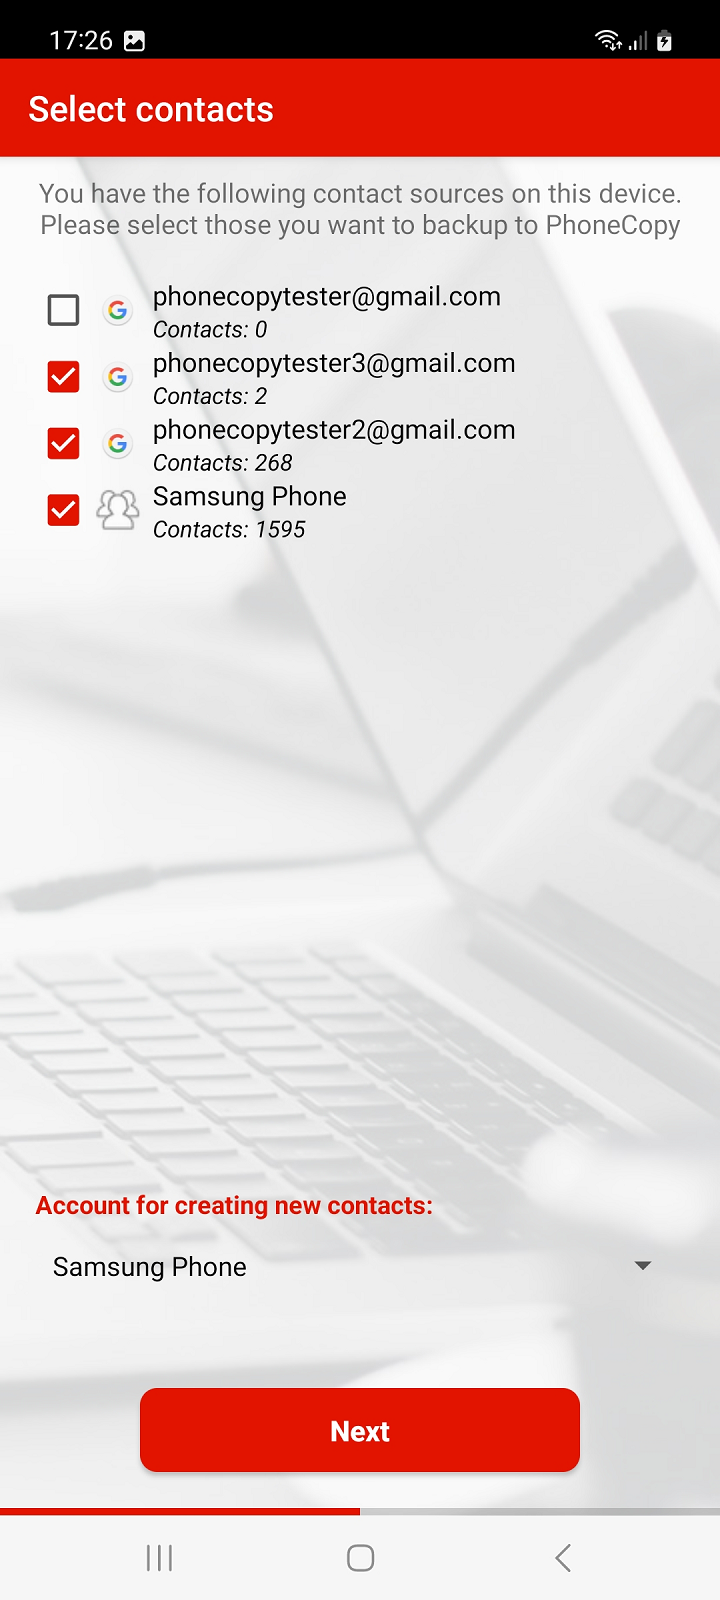
Then select the account with the contacts you want to backup or sync to PhoneCopy and press Next to continue.
Note: If you select multiple accounts with contacts to backup or sync, you must select one of those accounts as the account for create new contacts. Contacts from your PhoneCopy account, which will be created in the web interface or which will be backed up from another of your devices, will then be added to this account.
Recommendation: If you select a Gmail account for backup or synchronization of contacts, we recommend that you simultaneously turn off the synchronization of contacts from this account with Google.
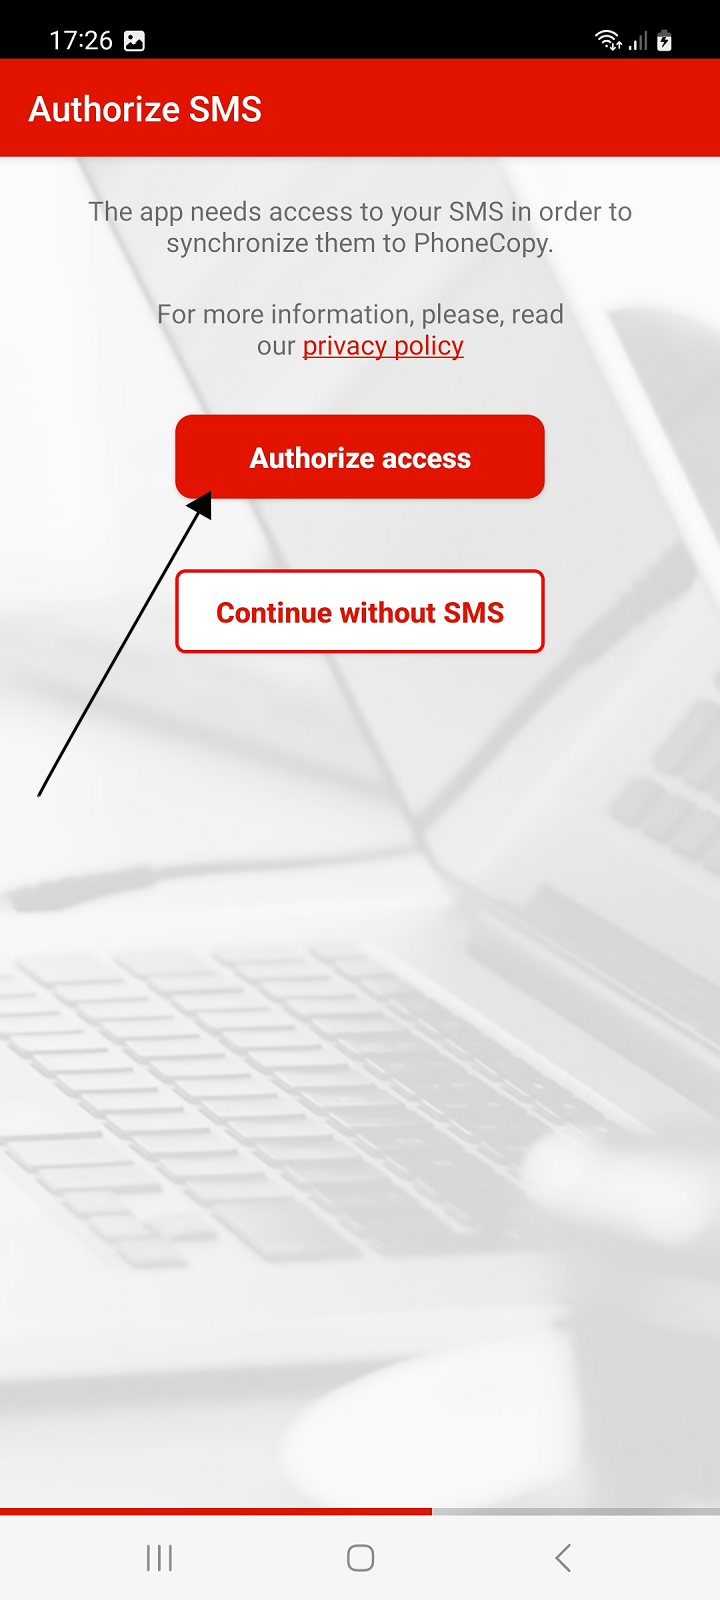
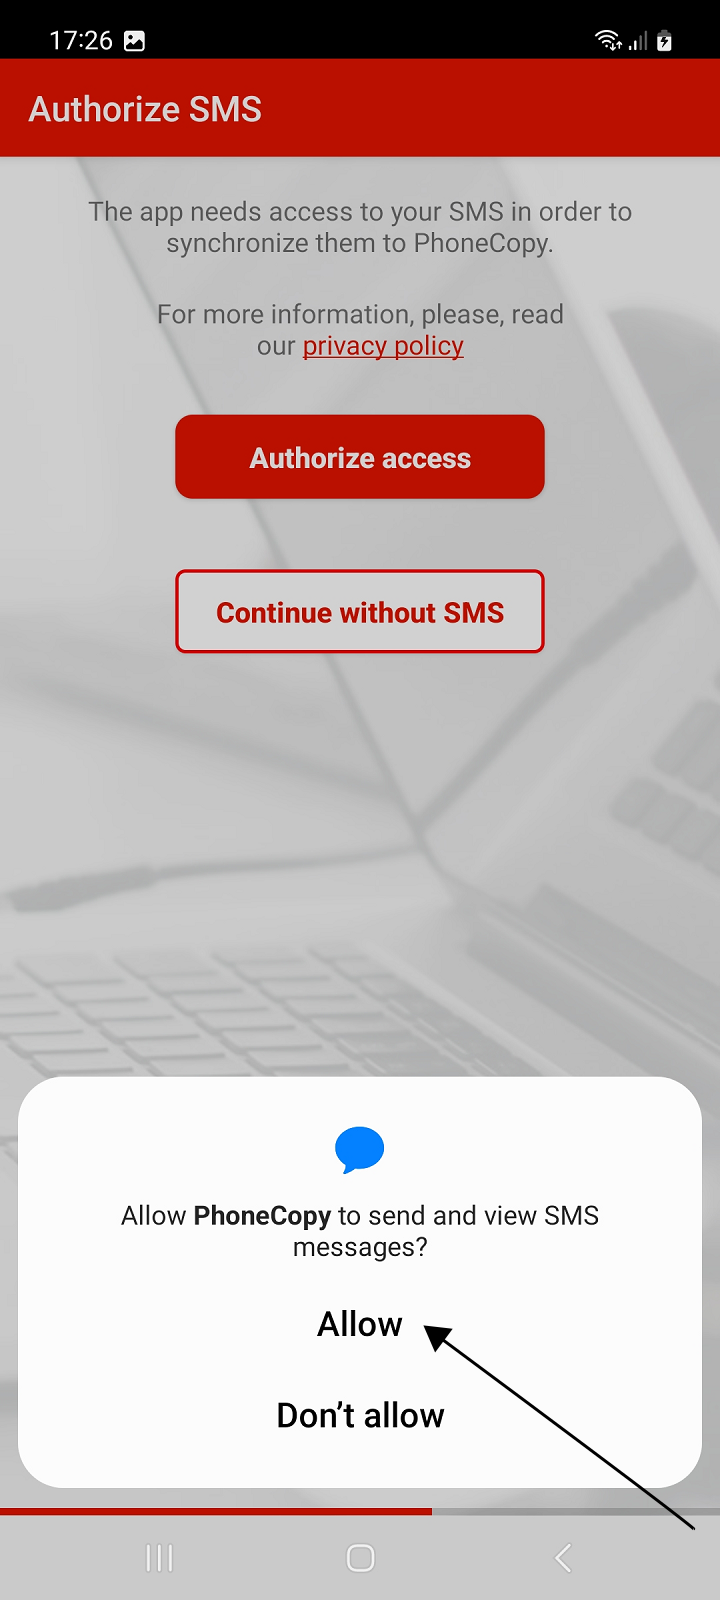
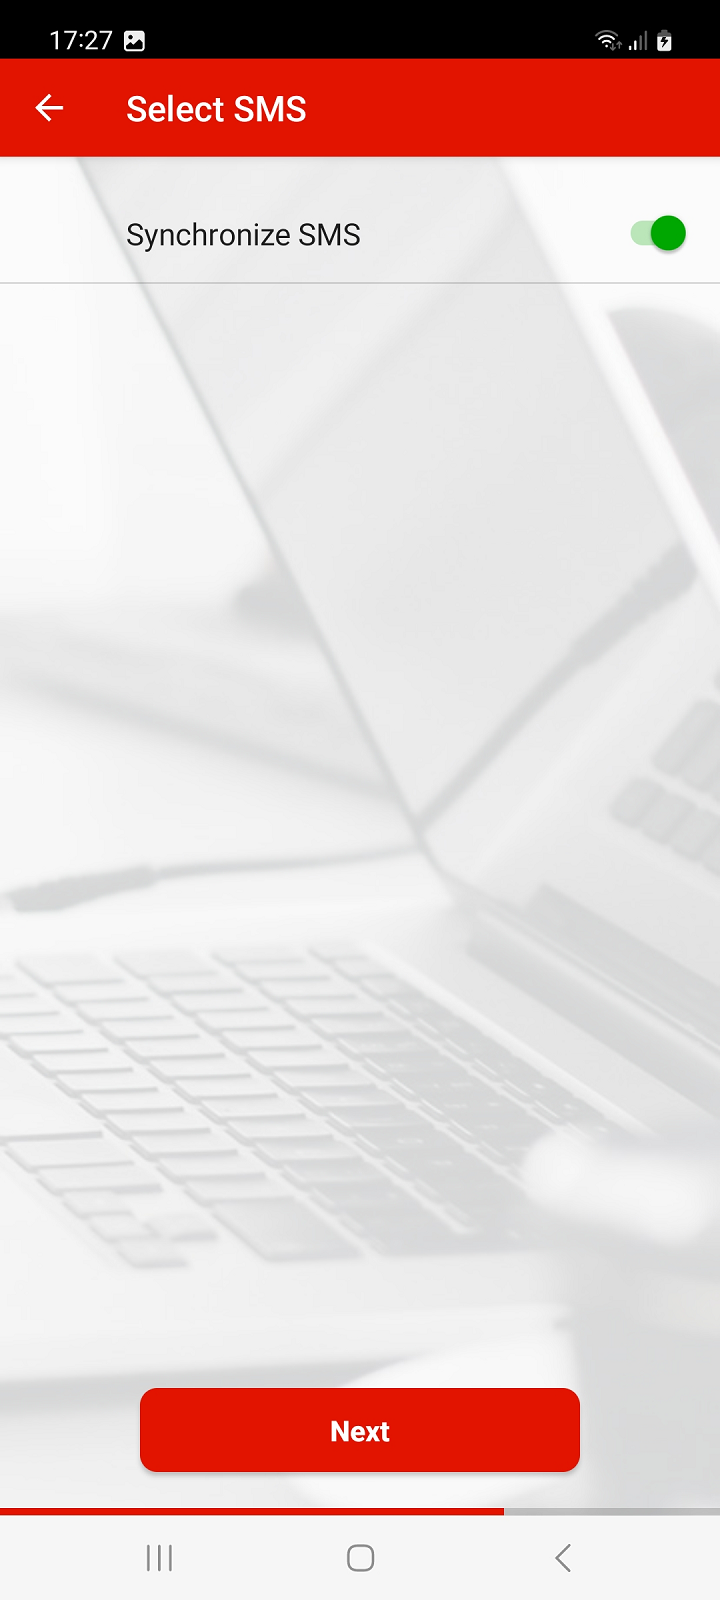
If you want to back up your SMS as well, allow SMS access in the next steps, then enable Synchronize SMS and press Next to continue.
Otherwise, press the Continue without SMS button to continue.
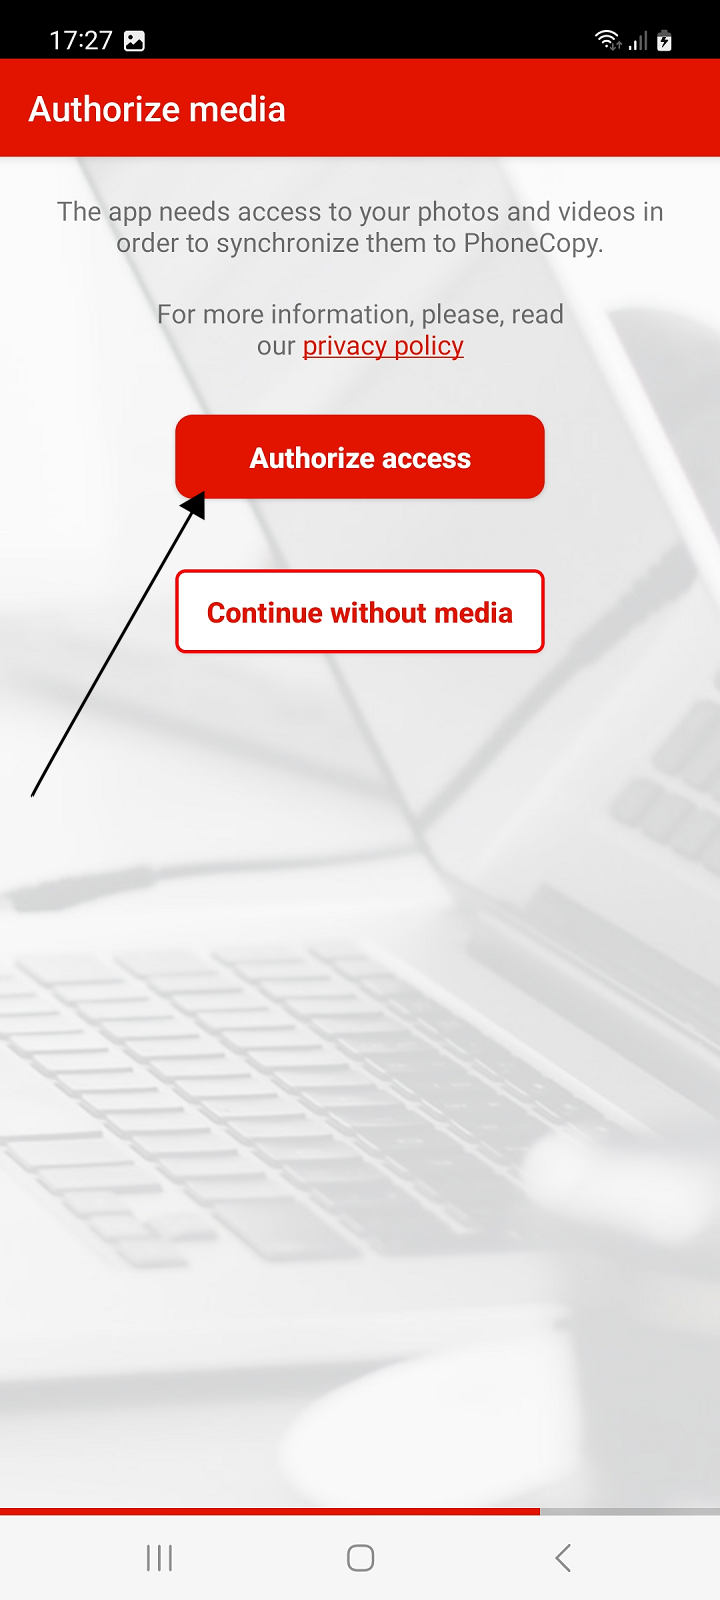
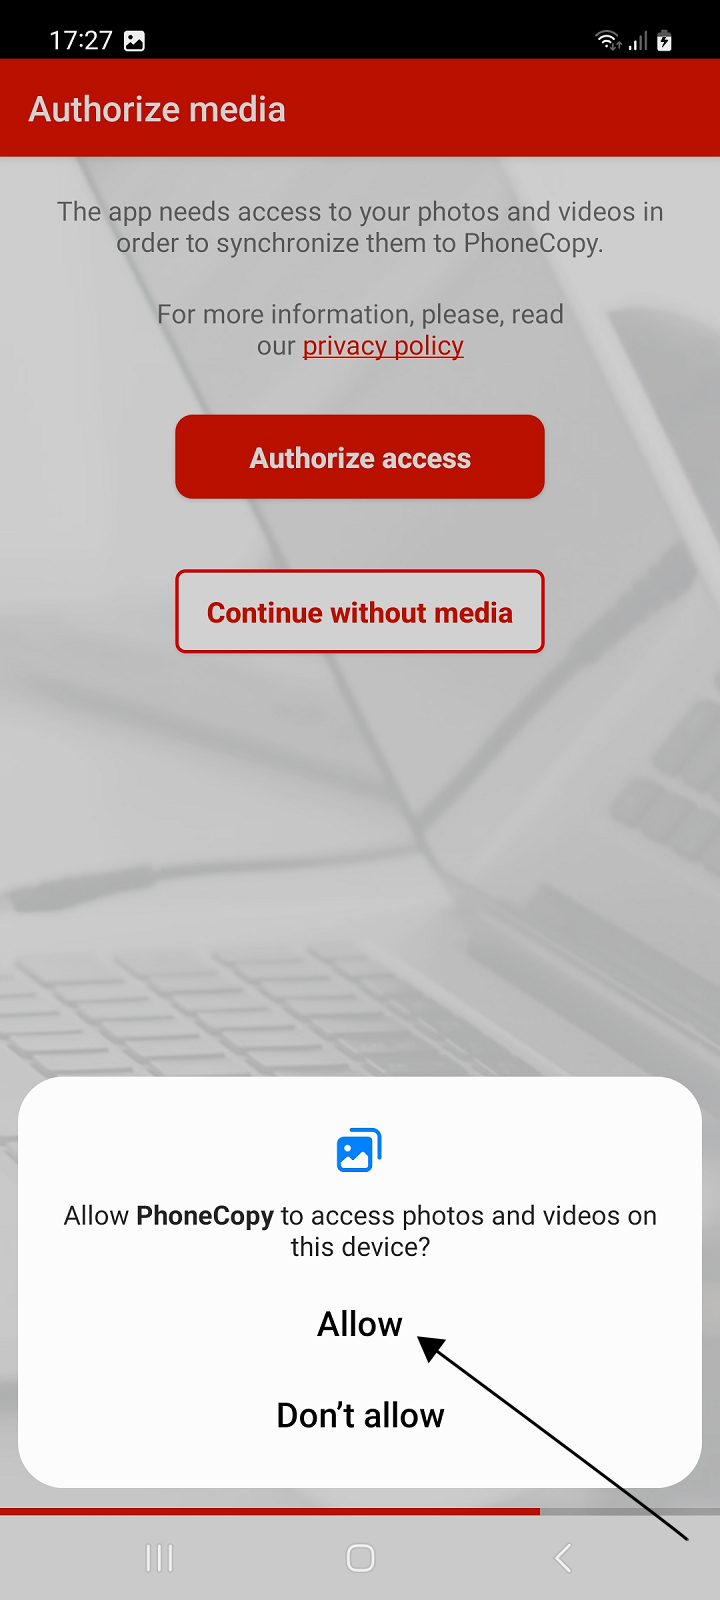
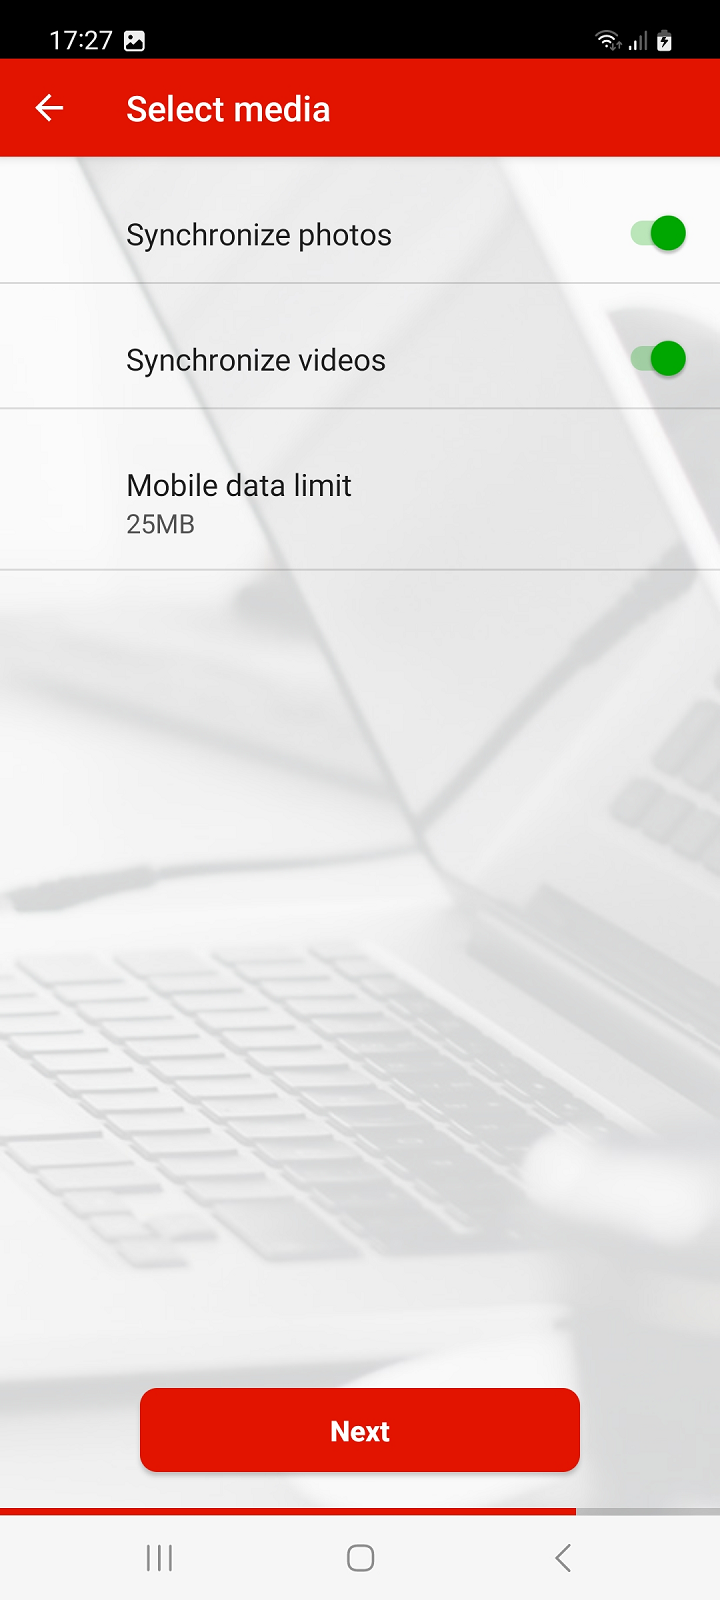
If you want to back up your photos or videos, allow media access.
Then choose whether you want to back up photos or videos by enabling Sync Photos and Sync Videos.
You can also set a mobile data limit to prevent it from running out. If you back up your media via mobile data, the backup will be interrupted when the set limit is reached.
Press Next to continue.
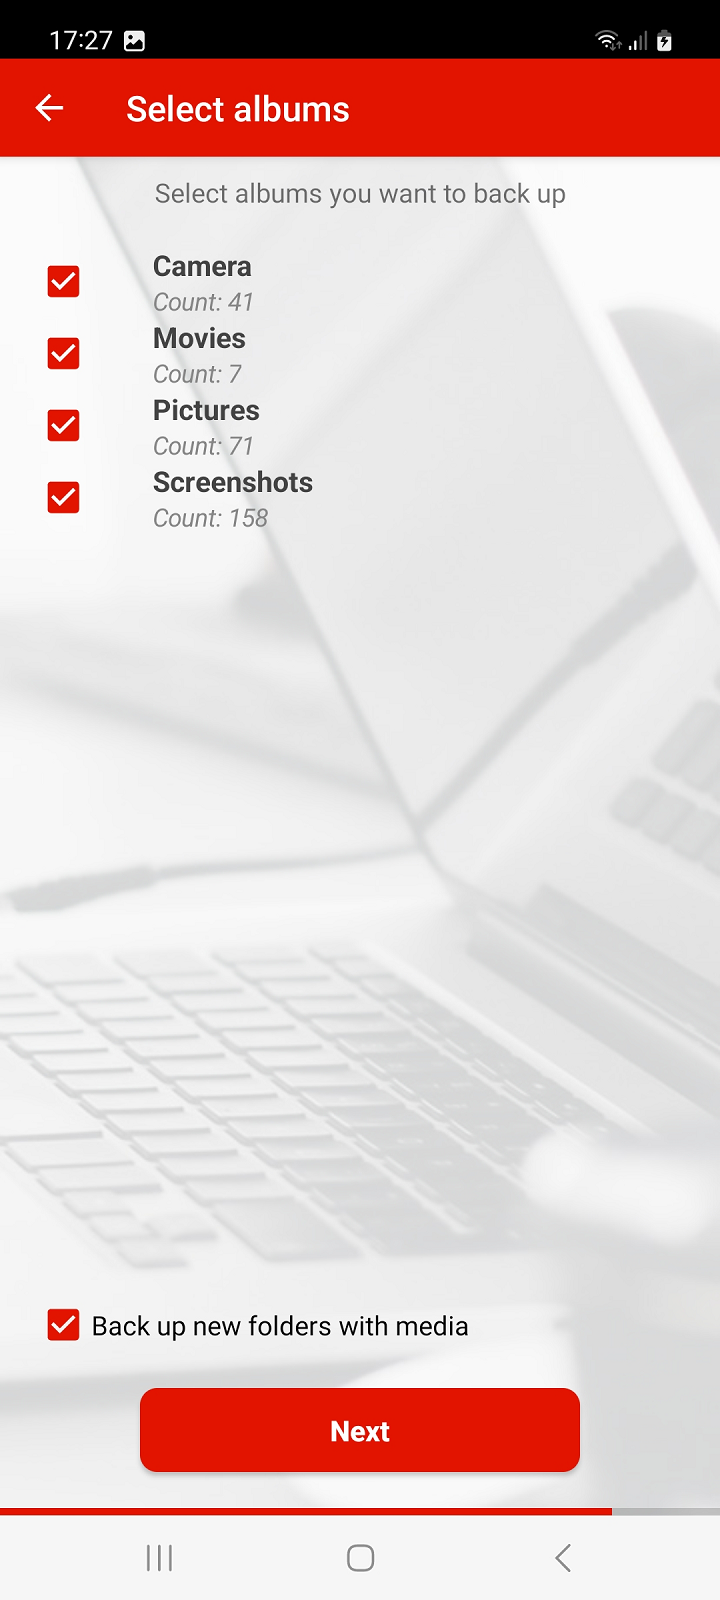
Then select the media albums on the device that you want to back up on PhoneCopy and continue by pressing the Next button.
If you do not want to back up or restore media, press Continue without media instead of allowing media access.
If you want to download to your new phone photos or videos that you previously backed up on PhoneCopy from another phone or device, select that device from the list on the following screen and press the Next button to continue.
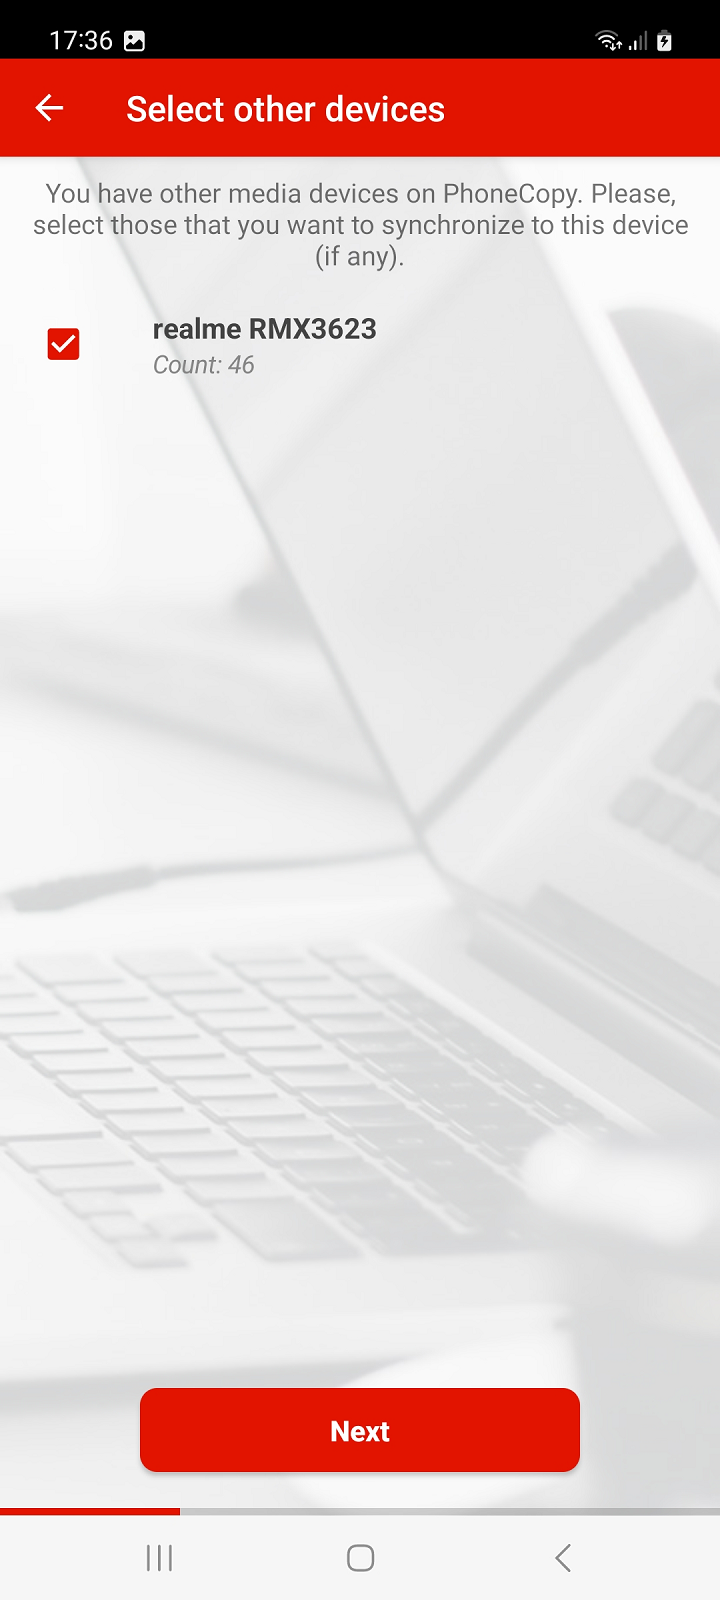
During synchronization with PhoneCopy, the backed up media from the selected devices will be created on your phone, in folders with the names of the individual selected devices from which they originate. These will be placed in the phone storage in folders according to their type, either in "Pictures" or "Movies".
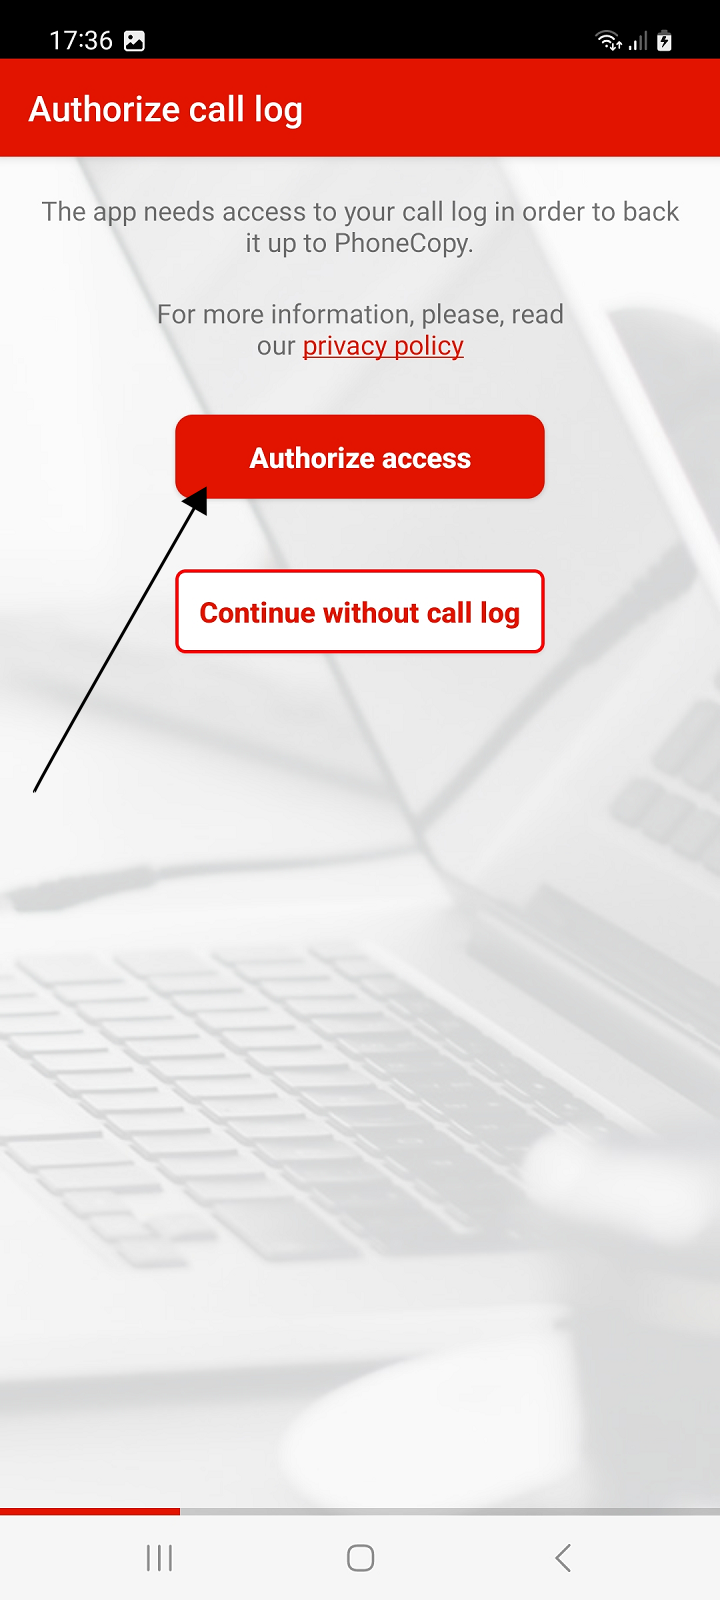
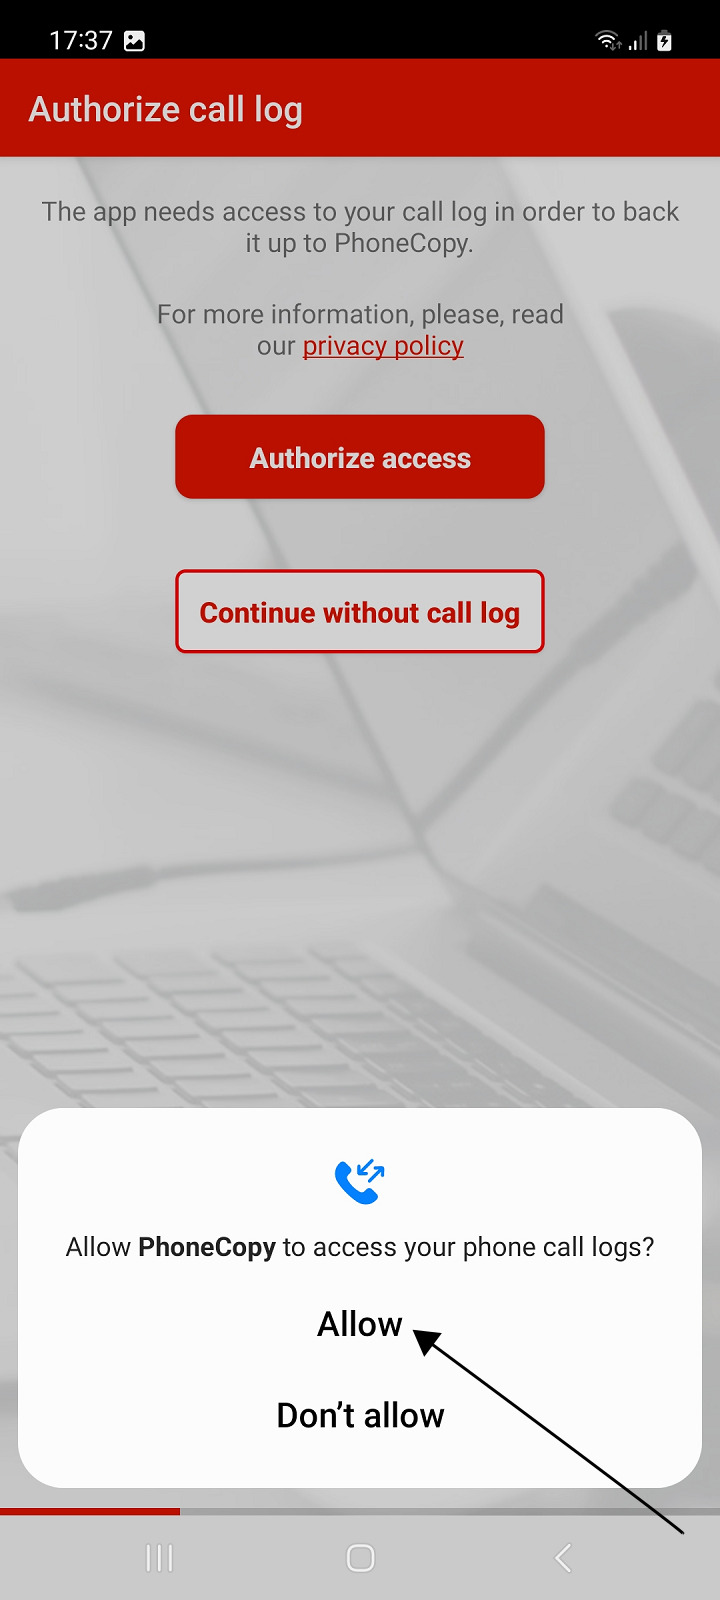
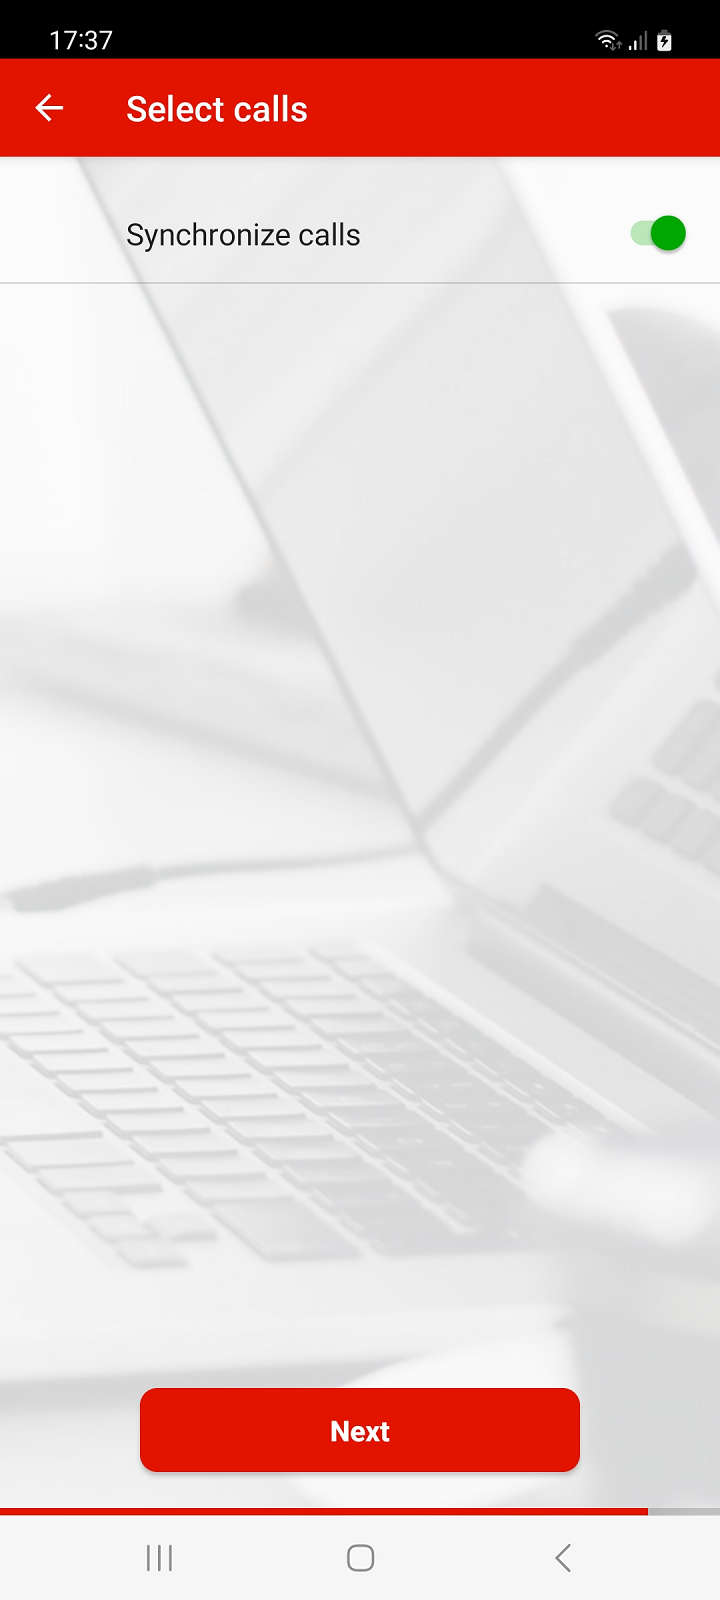
To backup your call log, in the next steps, allow call access, then enable Synchronize calls and press Next to continue.
If you do not want to back up call log, go to the next step by pressing Continue without calls.
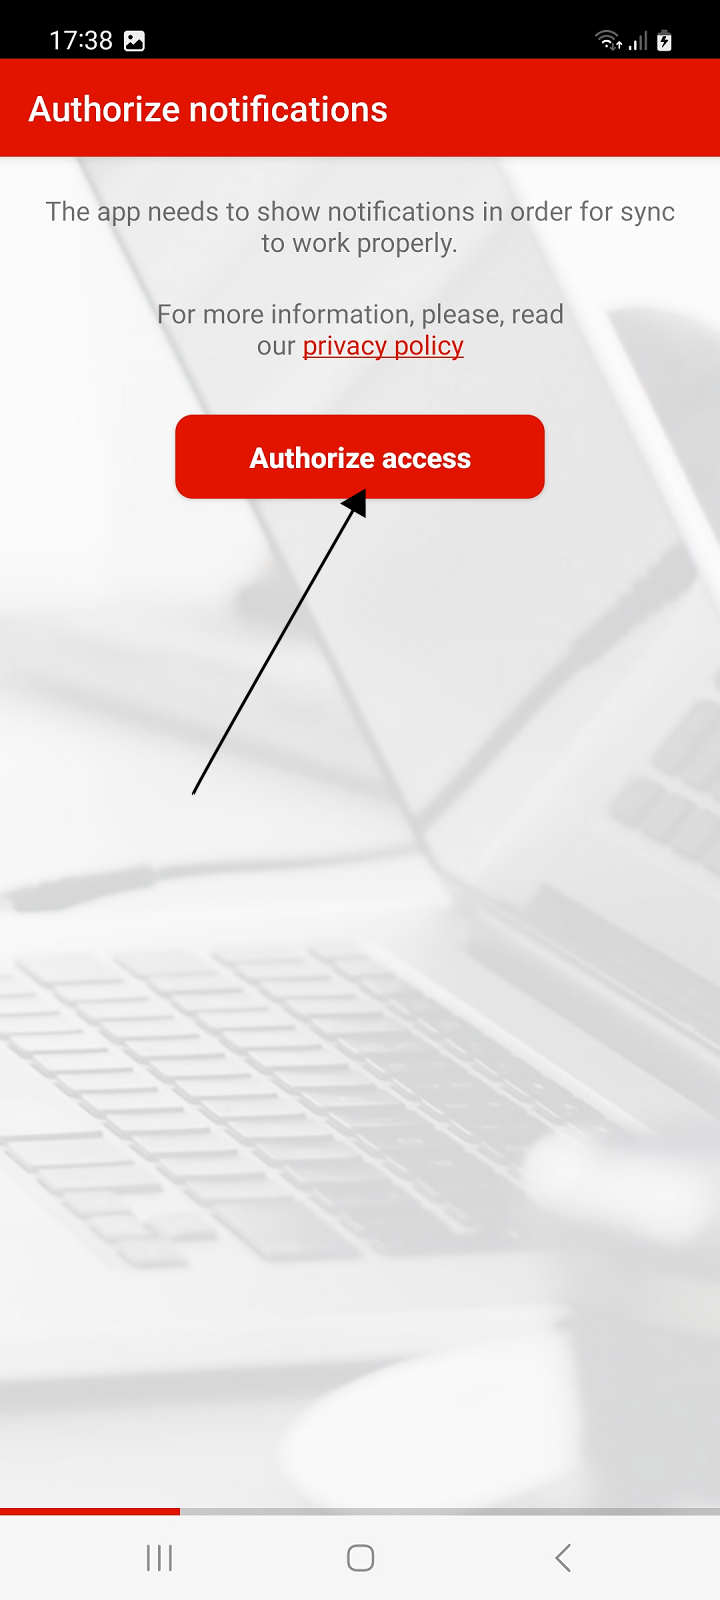
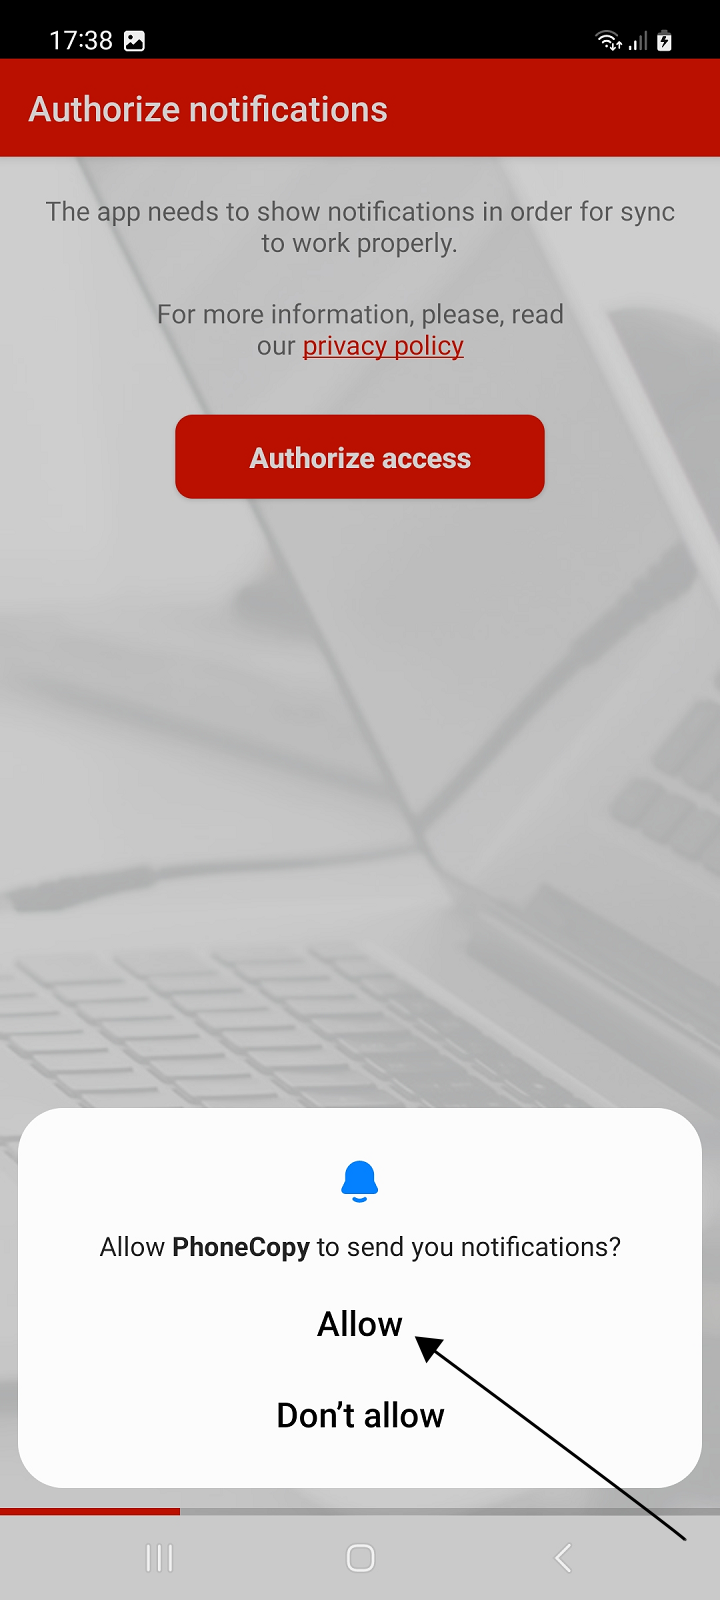
App running on Android 13 and later will ask the user for permission to send notifications.
Application have to display notification during synchronization. Without granted permission to send notifications, synchronizations will not work.
On devices with older versions of Android, this step will not appear.
Allow the app to show notifications. Then the final screen of the setup wizard will appear.
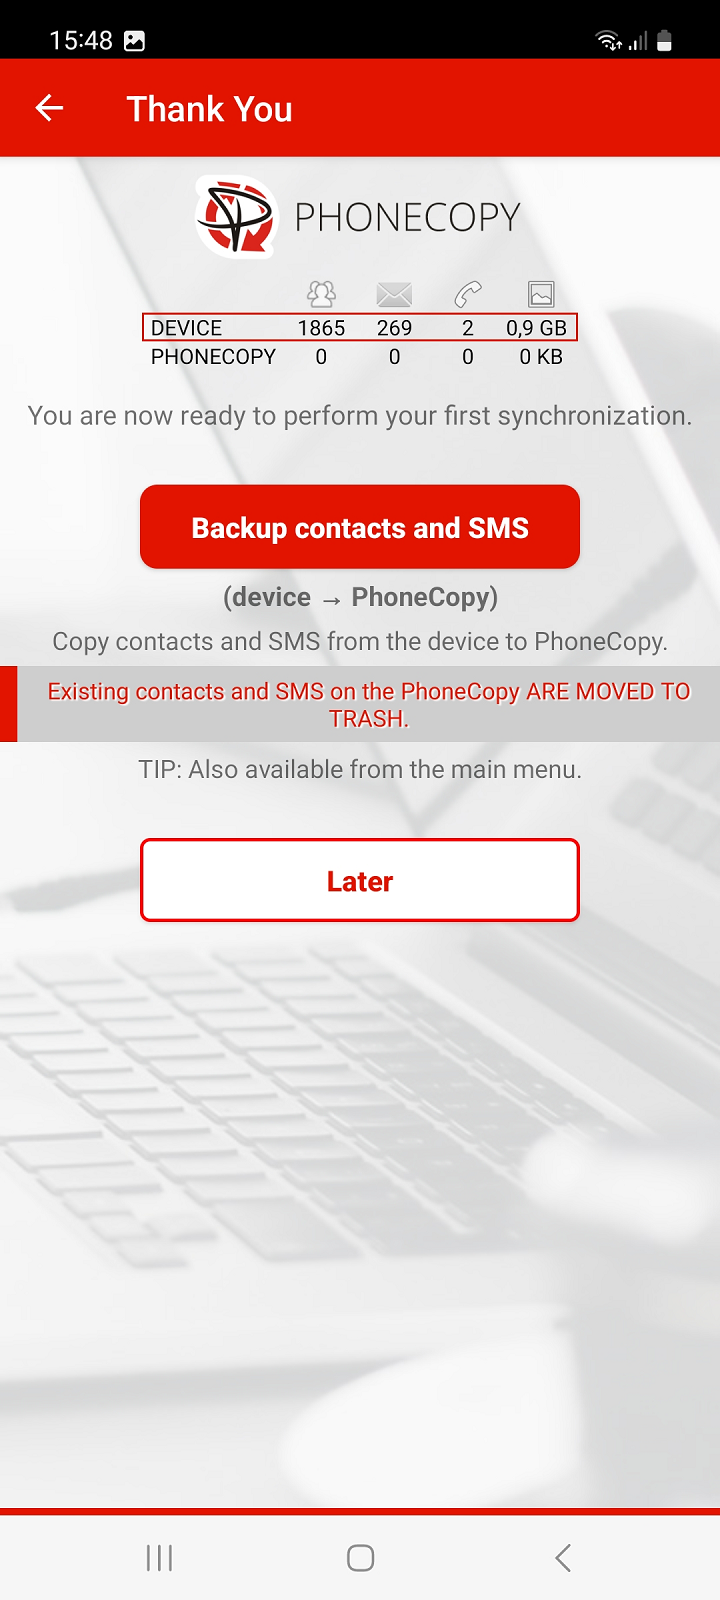
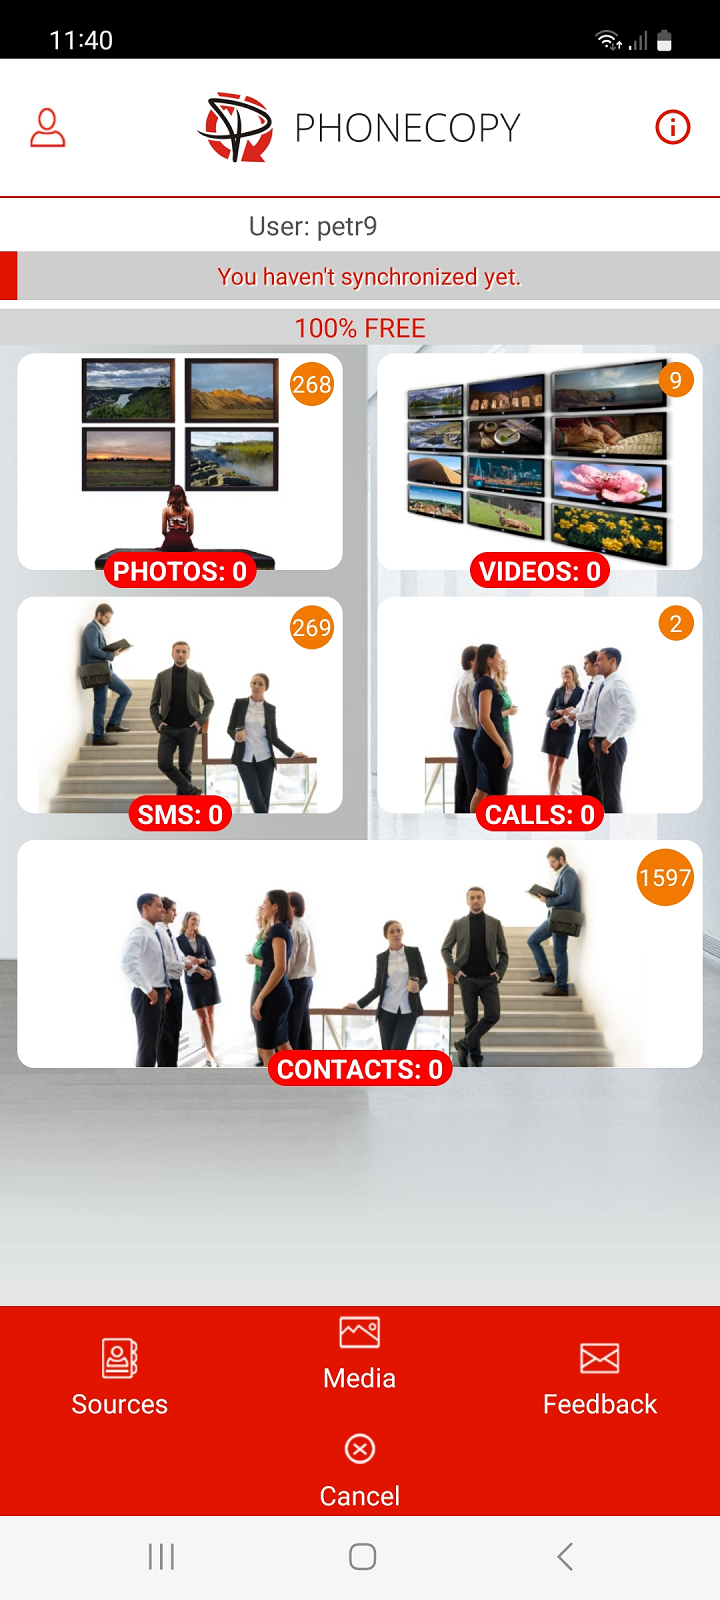
The last screen of the setup wizard shows a simple summary of the items from the device that have been selected for backup and the items already backed up to PhoneCopy.
Now you can perform your first synchronization.
If you have just registered and your PhoneCopy backup does not contain any data, the application will only offer you a backup of the selected items.
To backup the selected items to PhoneCopy, press the Backup button to continue.
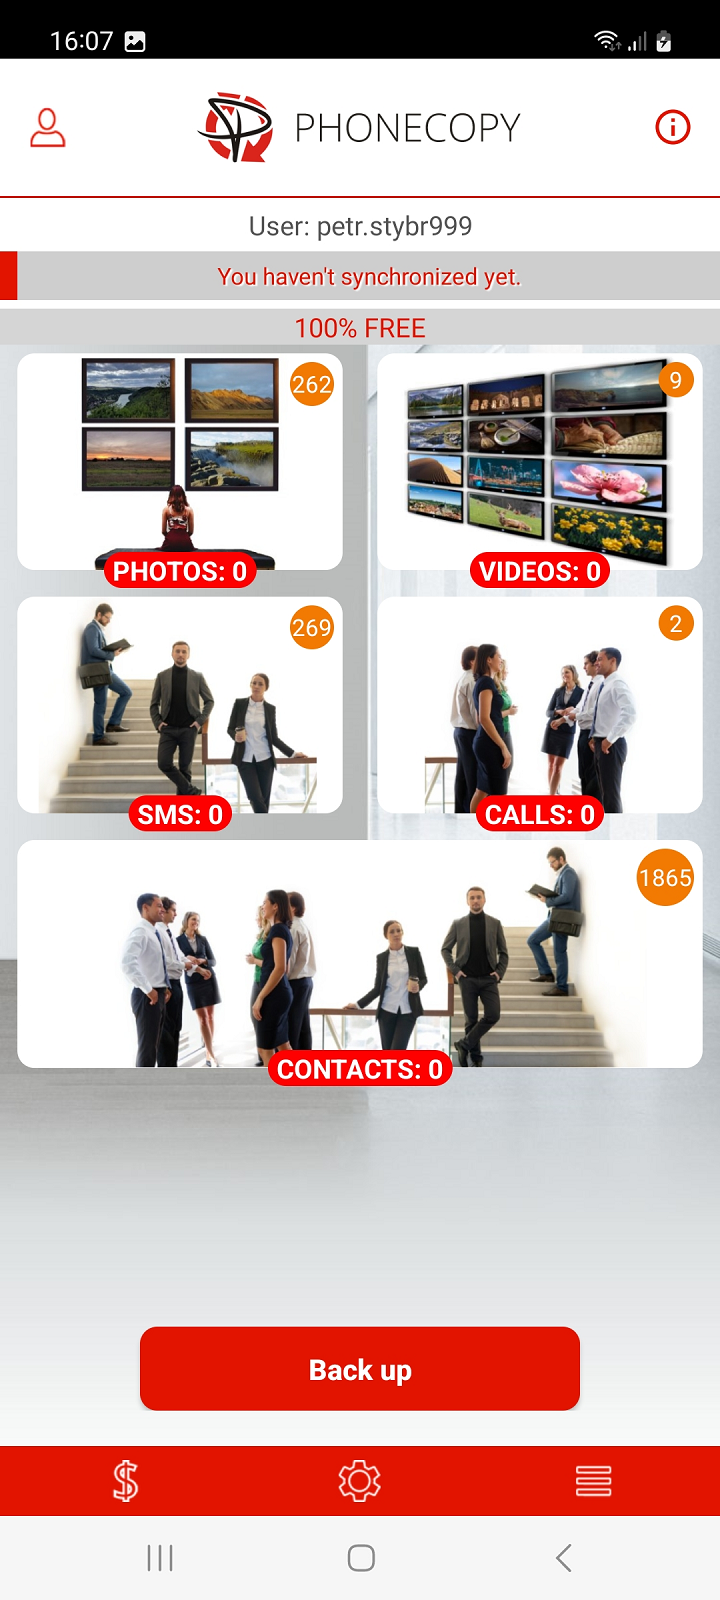
If you want to postpone the backup until later, press the Later button and then the main screen of the application will appear.
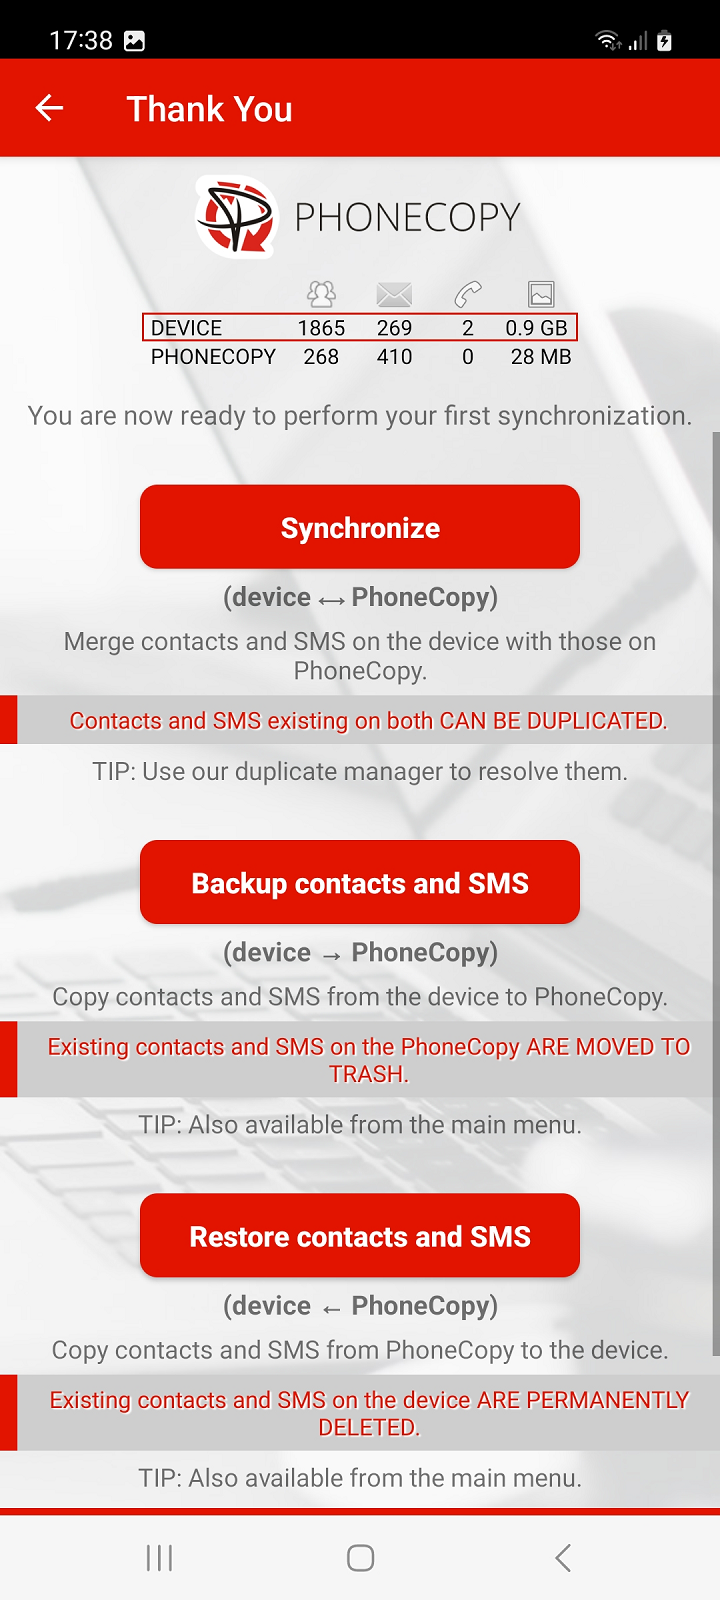
If you have logged in to your already existing account, the application will offer you the following options:
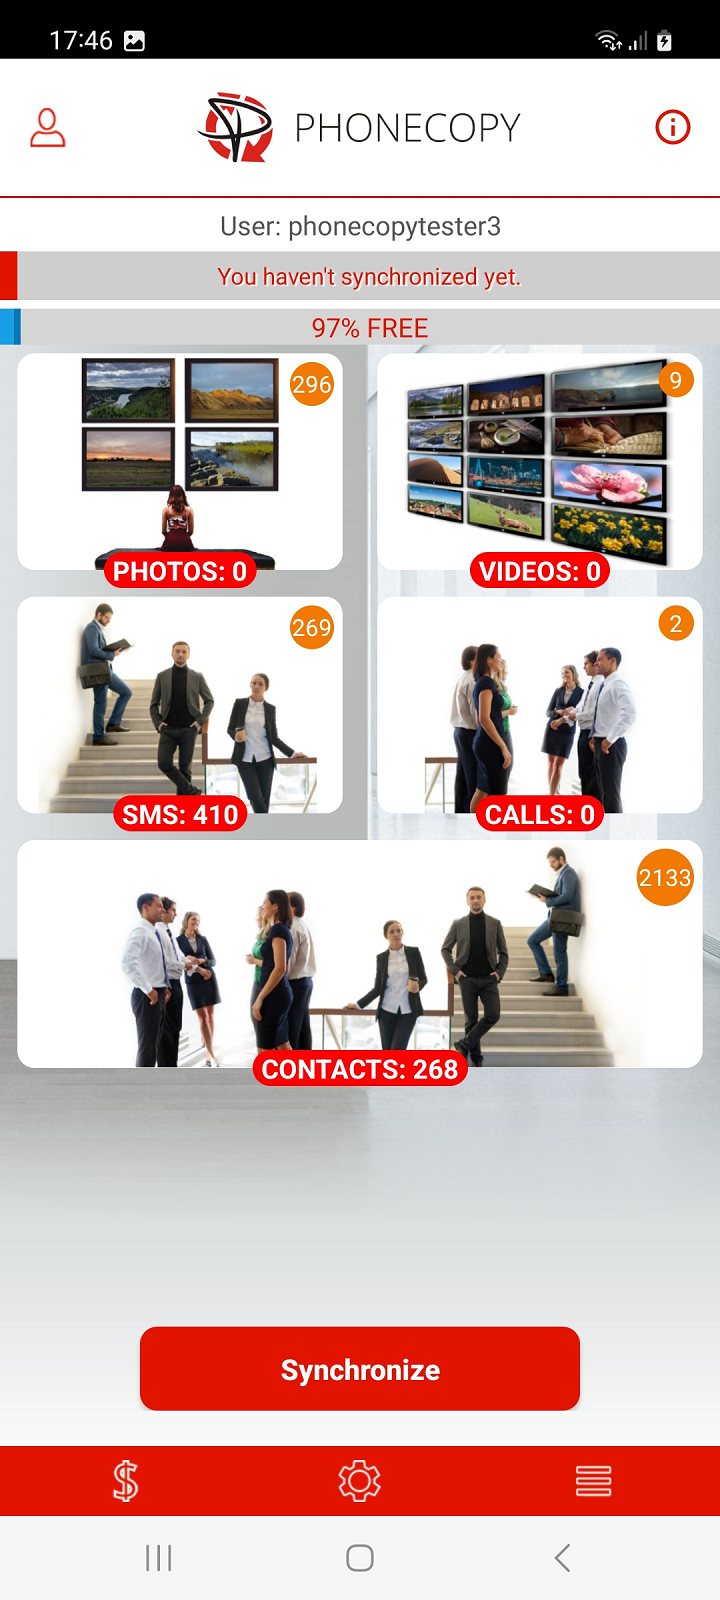
Synchronize (device - PhoneCopy)
Contacts (and SMS) from the device will be merged with those already backed up on PhoneCopy.
If both sides contain identical contacts or SMS, these items may be duplicated.
Tip: To resolve duplicates, you can use our duplicate manager in the PhoneCopy web interface.
Backup (device › PhoneCopy)
Selected items from the device (contacts, SMS, calls, photos and videos) will be copied to PhoneCopy.
WARNING! Existing contacts, SMS and calls on PhoneCopy will be moved to the trash.
Tip: Deleted items on PhoneCopy can be restored from the trash at any time. Items that have been deleted more than 365 days ago may be automatically removed.
Restore (Device ‹ PhoneCopy)
Contacts, SMS, or photos and videos from PhoneCopy will be copied to the device.
WARNING! Existing contacts and SMS on the device will be permanently deleted.
Tip: If you want to keep existing contacts and SMS on your device, choose Synchronize.
Later
Select this option if you want to postpone the backup until later. The main screen of the application will appear.
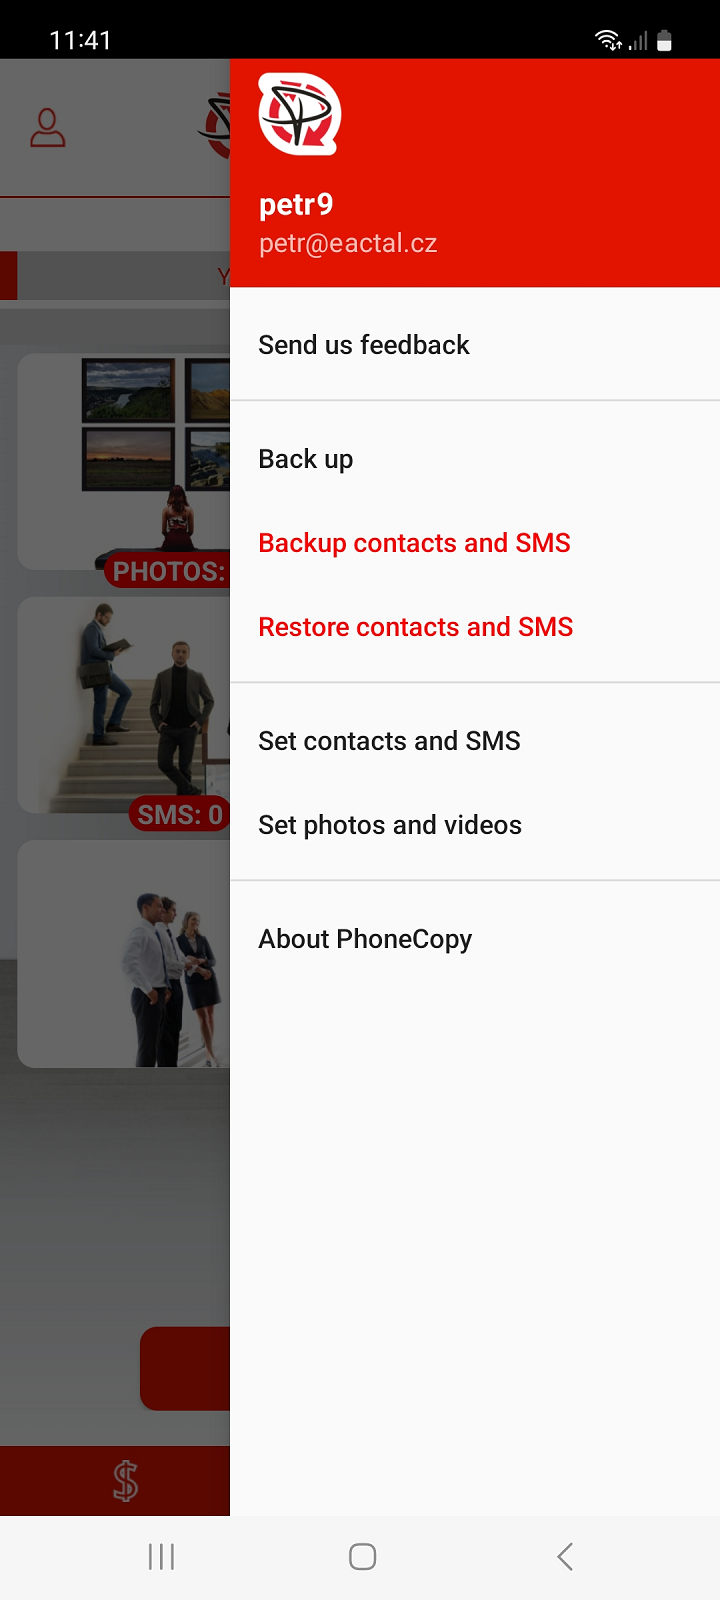
After logging in and initial application settings, you can change the individual settings at any time.
The settings menu is available at the bottom of the main screen or can also be displayed by swiping the screen from the right.
In the top left corner, a menu of basic functions is available for users.
If you exceed the limits for free account, we recommend purchasing the Premium version.
Download PhoneCopy for Windows to your Windows PC, which you can download free of charge. After downloading and installation PhoneCopy icon will appear on your desktop.
Start the application and small PhoneCopy icon will appear on right bottom corner of your screen on status bar. When you will press this icon at first time you will be asked to fill your username and password. Any next icon click will start synchronization.
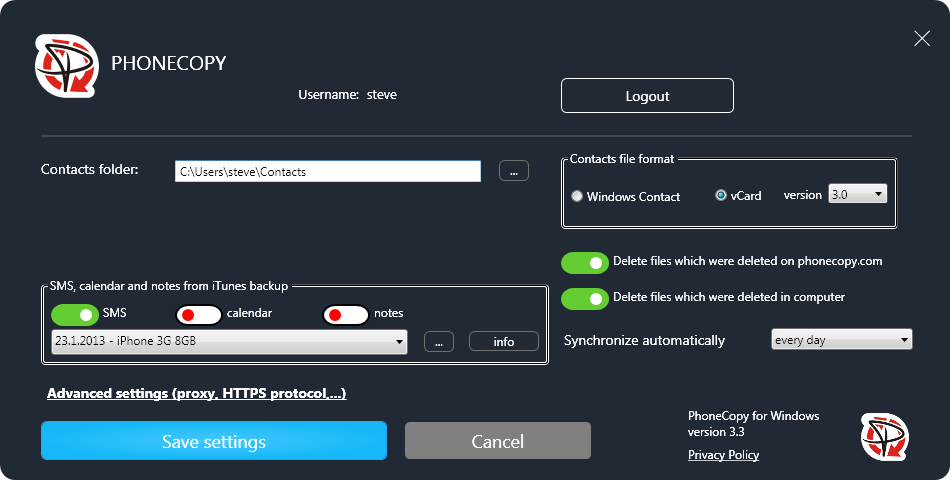
Start PhoneCopy for Windows. Fill your PhoneCopy username and password, then select the local directory where you stored your contacts, and choose VCARD format which will be used (we recommend to use 3.0 which is pre-selected - this is the right option when you are looking to import contacts from .vcf). Another option is to use native Windows Contacts format and synchronize directly from/to Contacts folder. Moreover, you can set your proxy on the same screen.
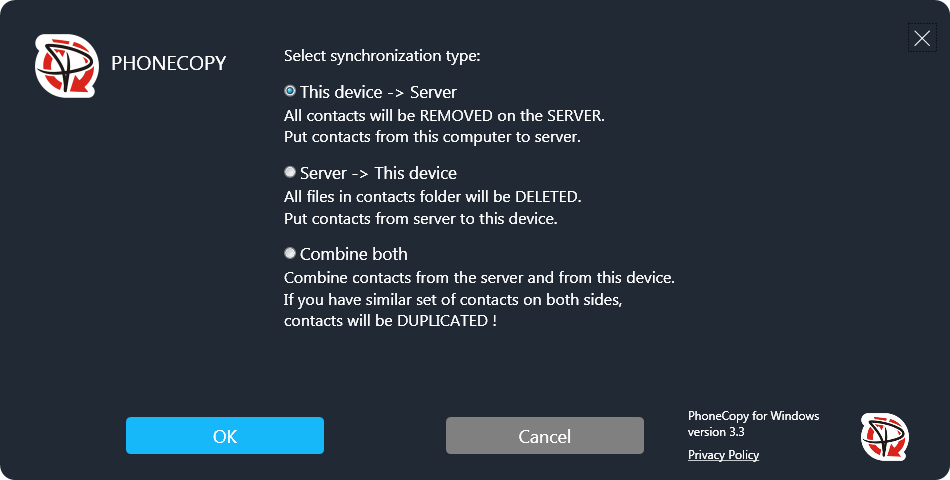
Now you can start the first synchronization on your Windows to transfer your contacts from/to PhoneCopy server. When synchronizing for the first time you can select synchronization direction. When you will add any VCARD contacts to selected directory you will see it synchronized to PhoneCopy after next sync. Status bar icon is animated during synchronization process.
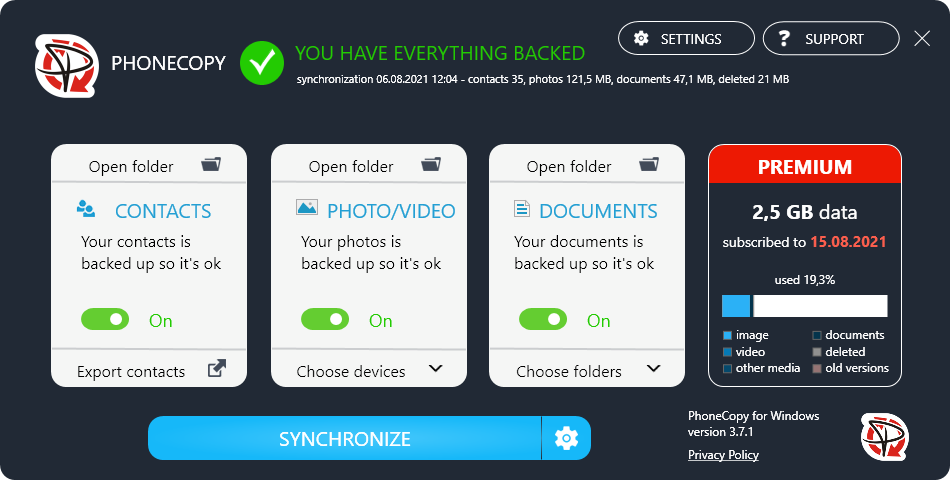
When synchronization finish you will get confirming message.
This guideline also works for similar devices like Microsoft Windows 2000, Microsoft Windows 2003, Microsoft Windows 2008, Microsoft Windows 7, Microsoft Windows 8.1, Microsoft Windows 98, Microsoft Windows ME, Microsoft Windows Vista, Microsoft Windows XP.
Well done — your contacts are now securely backed up in the cloud. Open your PhoneCopy account in any browser to review your data or make changes at any time.
It is a good idea to run a sync before any major change, such as a factory reset or an OS update. That way, your contacts are always protected before anything unexpected happens.